
Would you like an easy to use and configurable test fire system for testing your mirror alignment and even quickly testing materials? This blog describes the setup in Lightburn.
Background – your K40 has been transformed, and your old front panel test button doesn’t work anymore
Whether you upgrade an analogue or digital K40 from a Nano board to a Mini Gerbil, you’re accepting digital control over your laser, and so the physical test and power level controls on the K40 front panels don’t work anymore. Your K40’s power level is now controlled completely through the Mini Gerbil and ultimately by your computer software such as Lightburn.
Easily set up a convenient test button in Lightburn
Lightburn has a convenient feature to support user written ‘macros’, which are miniature programs with $ settings and gcode. So we just write the some $settings and gcode to perform a laser pulse, and insert it into a macro button that can be operated with a click of the mouse.
Open Lightburn and right-click on the Macro0 button
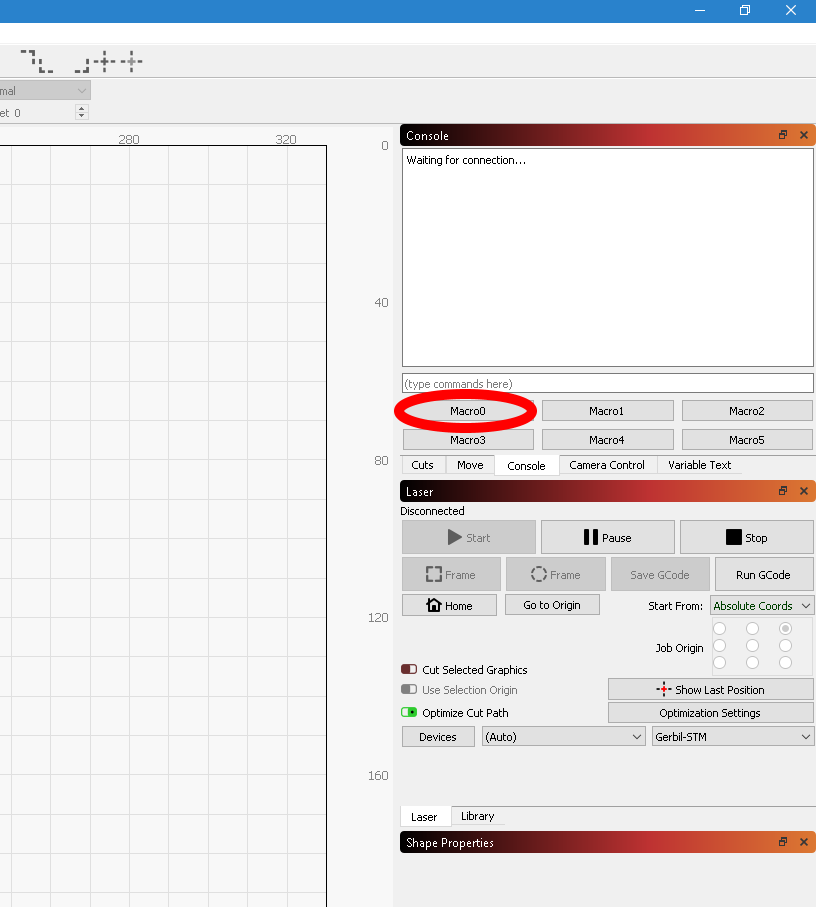
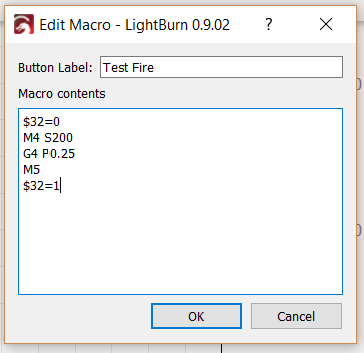
Type in the button label and the following gcode.
Then press ok
Now whenever you want a laser test pulse, just left click on the macro button labelled ‘Test Fire’, easy!
If you’re using the test fire macro to test mirror alignment, S200 is a bit much, you could drop it to S130.
Understanding the program and customising power and duration
You can always right-click again on the macro button to edit the settings within it. Here’s an explanation for each line of the macro program:
$32=0 Temporarily enter CNC mode for test pulse purposes – this allows the laser to fire even if the laser head is stationary. Don’t edit this line.
M4 Turn on the laser! Don’t edit this line.
S200 Set the laser power to 200 level, out of a maximum power level defined in $30. The standard maximum power level in Mini Gerbil is 1000, so 200/1000=20% power laser. You can edit S200 from anything between S1 to S1000, but be aware that CO2 tubes don’t operate at the low end of the scale, for example, below S90.
G4 P0.25 Wait (G4) for 0.25 seconds. A quarter of a second is typically about right for a short burst of laser power for mirror alignment purposes, but edit this line as you see fit.
M5 Turn off the laser. Don’t edit this line.
$32=1 Return the MiniGerbil to normal Laser mode. The main difference is that Laser mode has a safety feature to ensure the laser can only operate when the laser head is moving. This scenario represents typical laser use and prevents the possibility of a stationary laser burning a workpiece too much and causing a fire. Don’t edit this line.
Create up to six macros by right clicking on the other Macro labels
Thank you Dan! This is exactly what I was looking for.
I recently got the MG3 board and was not convinced about using the macro instead of the test fire button, but having tried it I must admit it works very well.
Overall I am very impressed with the board (replacing my failing Cohesion 3d board), keep up the good work
Thanks Alan. Yes, it’s a mindset change from manual to macro, but we figured that the precision and repeatibility of a test fire macro will best help our users dial in their material burn levels. Cheers for the feedback