
Here’s the run down on running your rotary from the Mini Gerbil. For individual support, email our support (@awesome.tech) or post on our K40 forum.
Key concept – no rotary limit switch, so no homing
A rotary doesn’t have a limit switch, so this means the homing operation won’t work as designed. So the first thing to do is to disable auto homing on startup.
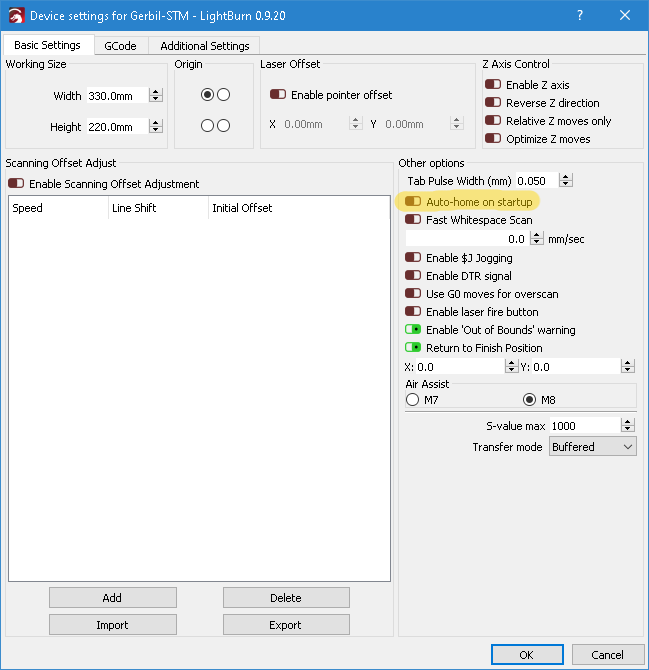
Do not press Home while in Rotary mode! If you do, the machine will go into error mode because it searches for, but can’t find, the limit switch. Even if you exit error mode with $x, the controller has lost knowledge of the gantry position and consequently the controller’s current position value will be jumbled. You can see this under LightBurn’s Move menu by clicking ‘Get Position’. The consequence is that the gantry tries to get back to home from a jumbled current position value, causing a crash of the laser head – ouch!
Connecting a generic Rotary to Mini Gerbil using Lightburn
A Pre-checks
You have assembled your rotary physically.
You have confirmed your Mini Gerbil is working correctly in normal XY mode.
B Choose a cylindrical test workpiece
1 select a low value laser-safe cylindrical item for setup/practicing of the rotary. Better to chose something with some weight, as light objects need stabilisation (use a sock full of rice or sand to keep the centre of gravity low, or lower the rotation speed.)
2 measure and note down the diameter of the test workpiece in mm
3 adjust the mechanical settings of the rotary to suit the test workpiece
C Determine Rotary characteristics
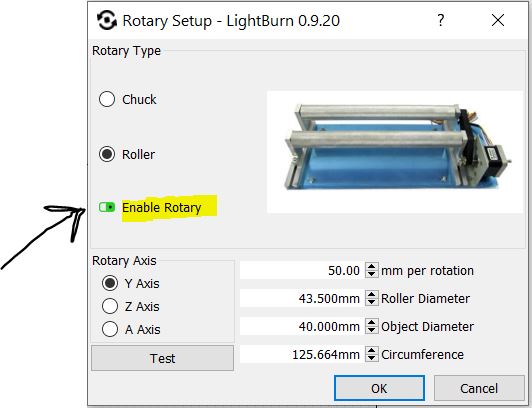
1 Measure and note the diameter of the rotary’s wheels in mm.
2 With your K40 turned off, plug in your rotary to the Y axis of your controller. If you want fast and easy changing between XY and rotary modes, consider our rotary switch product.
3 Place a small square of sticky paper cut from a post-it note onto the rotary wheel, and operate Lightburn’s Jog Y command, until the jogging distance (in mm) results in exactly one revolution. Note that jogging distance value down for a later step.
D Setup the Rotary in Lightburn
1 Place the laser-safe test workpiece in the rotary, such that its top surface is at the your laser’s focal distance.
2 From the Lightburn tools menu, select Rotary setup. Assuming you’re using a roller-type rotary, enter the distance found from the Jog Y command (step C3) into the first prompt. Enter the rotary wheel diameter (step C1) . Technically the object diameter (step B2) does not matter when using a roller-type rotary but can be entered anyway. Turn on the ‘enable rotary’ slider and press OK.
E Perform test run
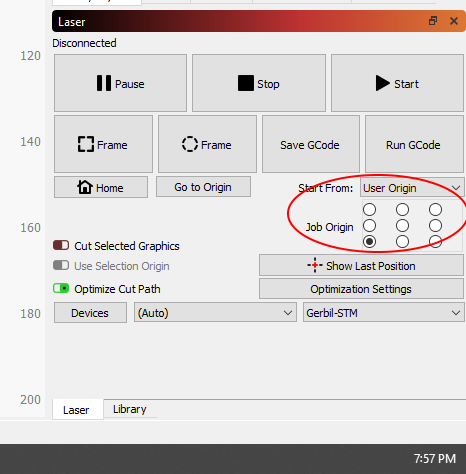
1 With your K40 turned off, slide the gantry down the Y axis with your hand, such that the gantry is positioned over the top (center-line) of the cylindrical workpiece where you want the lower left of the image to begin engraving.
2 Set up the engraving image in Lightburn. For initial tests, use a small text message that is asymmetric (example: ‘dog’). For simplicity of setup, the engraving image should just touch the top of the Lightburn workspace.
3 Let Lightburn know your laser head is positioned ready to start in the lower left of the engraving target area by selecting the dot as shown in the graphic below
4 Now turn your K40 on, but keep the laser beam main switch turned off on your K40 front panel, and press CUT in Lightburn.
Observe the rotational direction, rotational speed, laser head movement and stability of rotation. If the workpiece is rolling unevenly, lower the rotation speed and/or the mechanical aspects of the rotary. If the workpiece is moving too fast or slow, change the speed in Lightburn’s Cuts/Layers tab.
5 Following normal safety precautions for your laser, now enable the laser beam switch and run the job again.
6 Once engraved, check the text message reads correctly. If the text is mirror image, then reverse the rotary stepper motor plug a the Mini Gerbil controller or your rotary switch/cable. See bottom of blog for configuration within Mini Gerbil for advanced users only.
7 Measure the width and height of the newly engraved image. If the dimensions (allowing for curvature) match those in Lightburn then you have successfully calibrated the rotary. If not, revise the mm per rotation settings in Lightburn’s Rotary Setup.
To return to XY mode
- Turn off rotary with Lightburn Rotary settings
- Return the User Origin to Absolute Coordinates
- Reconnect the normal Y axis motor connection (another plug for our Rotary switch!)
Feedback on these instructions? Email dan@awesome.tech
Advanced instructions for configuring axis movement directions
You can issue $3=3 to flip the Y axis via software, but note that this would need to be reverted back to $3=1 before using the regular XY non-rotary movement again.
$3=0 (X,Y axis direction both positive)
$3=1 (X axis direction inverted)
$3=2 (Y axis direction inverted)
$3=3 (X and Y axis direction inverted)
A good article. Easy to follow and set up.
Question: do you have setup instructions or advice for setting and using a ‘Y axix Rotary chuck’. I have an Ortur YRC