
Good electrical grounding of your K40 laser is critical to correct and consistent operation. While grounding is a safety feature with respect to dangerous voltages, this article focuses on effective grounding for the K40’s low voltage DC circuit. Please consult other resources to ensure that your K40 is completely safe.
Due to the linkage to safety, please check the laws in your area – you may need to hire a qualified person to perform the work below.
K40 grounding instructions- Turn off your K40’s power off and disconnect the power lead
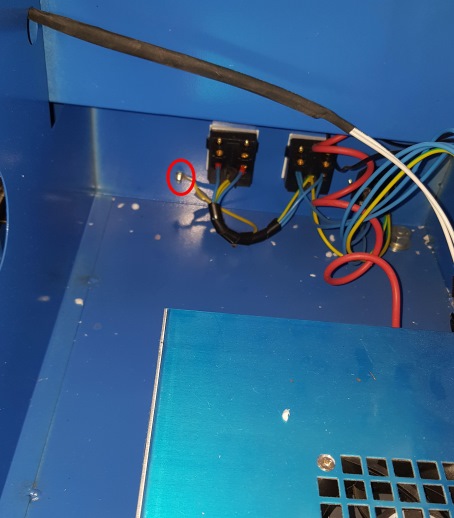
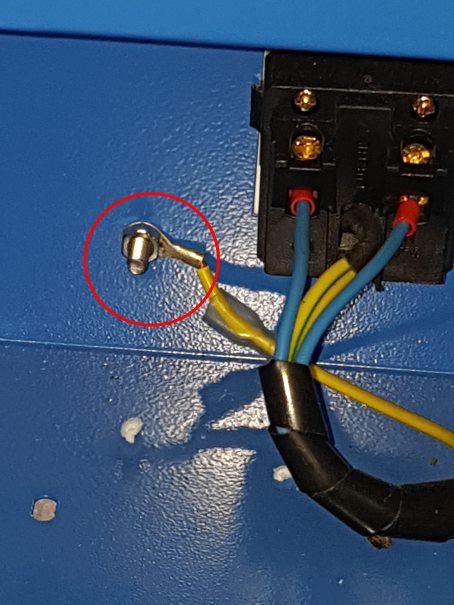
- Check that the grounding wire is making proper contact with the K40’s metal case. Do this by identifying the grounding (earth) point circled in red in the photos below. There are reports that some K40’s used PLASTIC washers between the green/yellow grounding wire and the case, which is completely unsatisfactory. The wire, washer, bolt and case must all be in electrical contact. Check the ground connection looks right and tighten up any looseness in the nut/bolt/connection.
- With your K40 still unplugged from the wall, set your multimeter to measure Resistance, and place probes on the earth pin of your K40’s power lead (green/yellow wire), and any exposed (unpainted) metal on the case of your K40 (other than the bolt shown in the above photo). Your multimeter should indicate very low resistance (eg. under 10 ohms).
- With your K40 still unplugged from the wall, check that your K40’s power supply is properly attached to your K40’s case. It should be firmly screwed in position, not just sitting on top of the case. It needs to be properly grounded.
Great advice. I think this is often overlooked. I double checked mine after reading this, just to be sure. I recently had my tube die and arc to the chassis. Without a good ground, I’d have gone for a wild ride, I’m sure.
Thanks David.
As stated, the above was written just to help the electronics work right, if there’s arcing going on, then that’s a huge issue. Additional to the blog above, the best thing is to use a 3 pin lead and power plug, as the 3rd pin is the ground line. Additional recommended steps are:
(5) With your K40 still unplugged from the wall, set your multimeter to measure Resistance, and place probes on the earth pin of your K40’s power lead, and any exposed (unpainted) metal on the case of your K40 (other than the bolt shown in the above photo). Your multimeter should indicate very low resistance (eg. under 10 ohms).
(6) Confirm that your electrical wall socket has a functioning earth. This can be accomplished by an inexpensive electrical socket tester from your local hardware store, such as https://www.homedepot.com/p/Dawson-3-Wire-Socket-Tester-DET301/300101768
Thanks for the feedback. In my case, the tube was definitely dead, even though it was gently used. The contact to the cathode inside the tube was no longer making contact with the plate inside. I replaced the tube and all is well. All of my ground contacts are good. I went through the entire ohming process to ensure it was safe to use before I ever fired up the machine, and have rechecked it since.
On a side note, I installed a mini gerbil that I got from you guys in my other laser last night. Haven’t done much except to cut out some squares, but so far, I’m really impressed with the speed and clean lines that I’m getting.
Glad your K40 is up and running and Mini Gerbil is making a difference! We’re always here for you if you need support.
I have a grounding pin on the back of the K40 chassis. The directions say I should attach a wire to this and run it to a staked earth ground. Is this true?
If it is, what gauge wire should I use? I will be running it about 5 to 6 ft and attaching it to a 14 Inch stake pounded in the ground. Is it OK for the ground wire to have rubber insulation except for the connections?
Thanks,
Hi John,
if your K40 is connected to the power by a three prong power lead (Active, Neutral and Earth), then there’s no need for a staked earth ground. To be extra sure your earth is effective, you could use a socket tester (as described in my comment to another question above), which is a handy device to test the electrical wiring of your home. A staked earth ground is only required where your power lead doesn’t have an Earth connection.
Cheers
Dan
One thing I would add is for you to check your ohmmeter first. Connect both of the test leads together and note the reading. This should be zero ohms or very close.
Then perform the checks as detailed in the previous posts. The readings you obtain should be within 0.5 ohms of your test reading. The ten ohm guide mentioned is way too high and would indicate a problem that needs to be addressed. The problems will almost always be at the connection points; either corrosion, loose connections, paint needing to be removed or similar. The addition of a small amount of lithium or silicone grease when assembling the connections will help prevent future corrosion.
I noticed that when I was checking out my machine the chassis was powder-coated under the main earth connection, resulting in no earth connection from the mains supply to the chassis!
Just my 10 cents worth……………
Ian Buglass