
The brains of laser cutters and CNC machines, G-code controllers, include settings covering speed, physical limits, directions and intensity (of a laser beam, or rotational speed of a spinning endmill). Even if you’ve bought a pre-made laser or CNC machine, you’re still likely to benefit from fine-tuning the settings for your materials or needs. And if you’re building your own laser or CNC, you’ll need to know all about controller settings.
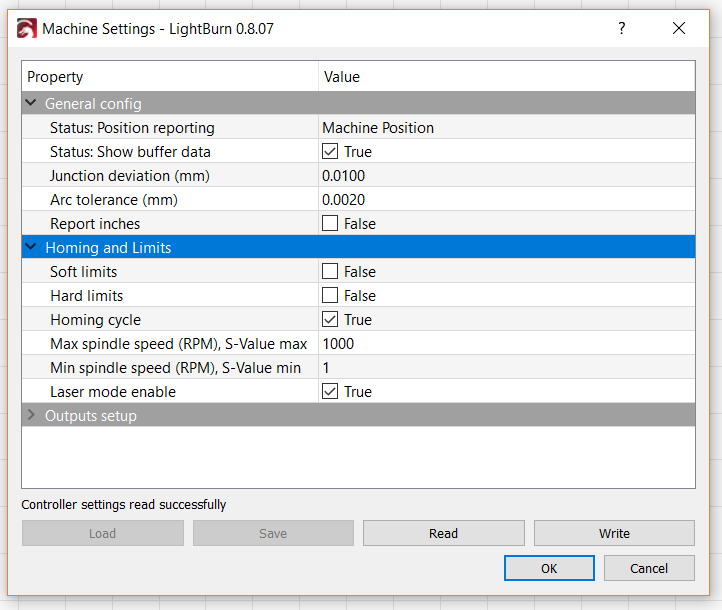
The best case scenario is that you can adjust the settings you need in a nice user interface, without learning manual configuration via a G-code sender. An example is shown in the image below, from Lightburn software, where the Laser mode enable can be set by clicking a checkbox. Checking the box actually sends settings to your controller in the background, user friendly right ?
So why don’t all machine settings just get shown in a nice user interface ? Well, there’s quite a few settings, and not all of them are relevant to each application and every user, so designers only make interfaces for the minimum. If you need to change a setting that’s not in the user interface, you’ll need to use the command line to send $ settings to your controller.
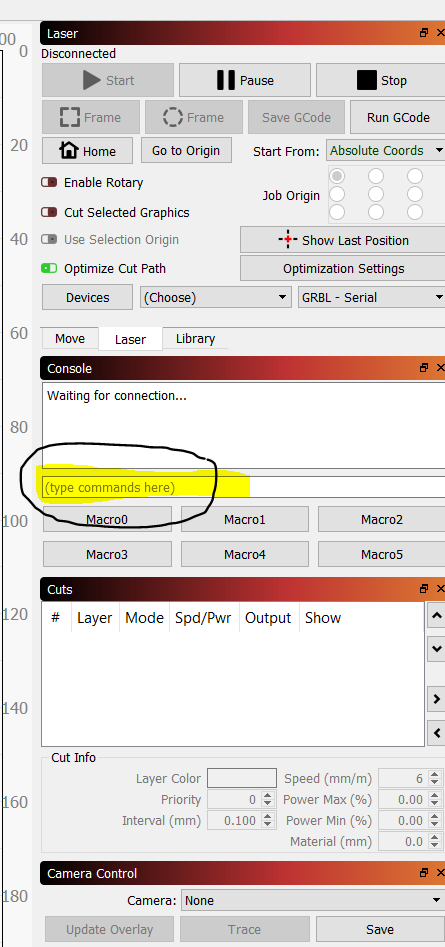
G-code controllers normally just receive movement directions, such as go to x position 150 at full speed is G0 X150 (note there is no F or feed rate parm, it assumes the fastest feed rate e.g. the $110 value. Reduce $110 if this is too fast). So the $ symbol indicates to the controller that the instructions relate to settings, and are not an instruction to move, burn or cut anything. The command line is circled and highlighted in the image below. It’s where you can click in the space and type in settings (or even directions such as G0 X150 directly).
The command-line is available in any G-code sender software.
Useful $ settings
The $$ command reads all your machine’s current settings. It’s a great idea to get started by typing $$ and copying and pasting the results to a backup document, so you can always go back to your existing configuration if you need to. Now you’re ready to make changes !
Our experience with K40 laser is that $100=157 and $101=157 are sweet spots for K40 laser x and y step distance. Why not try these out ? Try to cut or engrave a 100 x 100 mm square and measure it’s dimensions.
Another good K40 setting is to increase maximum speed. Experiment around with $110=12000 for x axis $111=5000 or higher for Y axis. 5000 in this case means 5000mm/minute, which is equivalent to 0.08 metres per second. At some point the machine can’t keep up with the signals it receives from the controller, and it’ll skip steps if you go too high. But a higher value that doesn’t skip steps means you’ll get more speed from your machine. Note: x axis rate is higher than y axis rate because of the k40 gantry design.
If you’re building your own DIY machine, must-have $ settings are the steps/mm ($100 for X axis,101 for Y axis), the travelling direction $3 (inverts the direction: 1 is for X, 2 is for only Y and 3 is for both X and Y) and the acceleration $120 and $121 for x and y axis. Safe acceleration settings are around 3000 and 5000 mark.
Back to lasering – another import setting is $30, which is the power range of the laser. When your laser engraves too darkly, increase the $30 from 1000 to a higher number like 1200 etc. Trial and error probably gives you the best setting. When your engraving is too light then simply reduce your $30 setting.
Once again, if you have user-friendly software like Lightburn, many of these settings are in the user interface. It’s just good to know that you can access all settings manually in any G-code sender software if you want to.
| $ setting | Default value | Description (for laser purposes) |
| $0 | 10 | Step pulse time, microseconds |
| $1 | 255 | Step idle delay, milliseconds |
| $2 | 0 | Step pulse invert, mask |
| $3 | MG2=1, MG3=2 | Step direction invert, mask |
| $4 | MG2=0, MG3=1 | Invert step enable pin, boolean |
| $5 | 1 | Invert limit pins, boolean |
| $6 | 0 | Invert probe pin, boolean |
| $7 | 0 | N/A to lasers |
| $8 | 100 | N/A to lasers |
| $9 | 100 | N/A to lasers |
| $10 | 1 | Status report options, mask |
| $11 | 0.010 | Junction deviation, millimeters |
| $12 | 0.002 | Arc tolerance, millimeters |
| $13 | 0 | Report in inches, boolean |
| $19 | 0 | N/A to lasers |
| $20 | 0 | Soft limits enable, boolean |
| $21 | 0 | Hard limits enable, boolean |
| $22 | 1 | Homing cycle enable, boolean |
| $23 | 3 | Homing direction invert, mask |
| $24 | 2000 | Homing locate feed rate, mm/min |
| $25 | 600 | Homing search seek rate, mm/min (default travel) |
| $26 | 250 | Homing switch debouce delay, milliseconds |
| $27 | MG2=4.0, MG3=4.5 | Homing switch pull-off distance (millimeters). Use 4.0 for mechanical, or 2.5 for optical limit switches |
| $28 | 5 | Laser PWM frequency. (1 till 15) 5 sets to 1.5kHz see https://awesome.tech/mg3-pwm-configuration-instructions/ for more details |
| $30 | 1000 | Maximum laser strength (must correspond with the laser application setting S=1000). Higher numbers gives larger range. If engraving too light, reduce this number and S application setting. See https://awesome.tech/lightburn-and-mini-gerbil-tips/ |
| $31 | 1 | Minimum laser strength, increase for high threshold tubes (delay) |
| $32 | 1 | Controller set to laser mode, Boolean. 1=enable (adjusts the laser strength on corners), 0 = disable (CNC mode) |
| $94 | 0 | Reset input pin: enable=1, disable=0, see for details here https://awesome.tech…/ |
| $95 | 0 | Air assist configuration (output pin): invert=1, non-invert=0 |
| $96 | 1 | Pause air assist when system paused: enable =1, disable=0. This function pauses the air assist during job pausing, and resumes when the job resumes |
| $97 | 1 | Safety door feature (input pin): enable=1, disable=0, see for details https://awesome.tech/mg3-debugging-safety-door/ |
| $98 | MG2=0, MG3=1 | PWM output signal: invert=1, non-invert=0, see for details https://awesome.tech/mg3-pwm-configuration-instructions/ |
| $99 | 1 | Laser On (LO) output signal: invert=1, non-invert=0 K40 laser fires when LO is pulled to ground. Marked as TTL on diode lasers (non-invert = 0) |
| $100 | 157.000 | X axis travel resolution, steps/mm |
| $101 | 157.000 | Y axis travel resolution, steps/mm |
| $102 | 160.000 | Z axis travel resolution, steps/mm. N/A to 2 axis MiniGerbil controllers |
| $103 | 160.000 | A axis travel resolution, steps/mm. |
| $104 | 160.000 | B axis travel resolution, steps/mm. |
| $110 | MG2=12000.000 MG3=24000.000 | X axis maximum feed rate, mm/min. 12000=200mm/sec. Reduce this setting if default travel ($25) or G0 X0 Y0 is too fast |
| $111 | MG2=5000.000 MG3=8000.000 | Y axis maximum feed rate, mm/min. |
| $112 | 5000.000 | Z axis maximum feed rate, mm/min. N/A on 2 axis Mini Gerbil controllers |
| $113 | 5000.000 | A axis maximum travel rate, mm/min. N/A on 2 axis Mini Gerbil controllers |
| $114 | 5000.000 | B axis maximum travel rate, mm/min. N/A on 2 axis Mini Gerbil controllers |
| $120 | 8000.000 | X axis acceleration rate, mm/sec^2 |
| $121 | 3000.000 | Y axis acceleration rate, mm/sec^2 |
| $122 | 3000.000 | Z axis acceleration, mm/sec^2. N/A on 2 axis Mini Gerbil controllers |
| $123 | 3000.000 | A axis acceleration, mm/sec^2. N/A on 2 axis Mini Gerbil controllers |
| $124 | 3000.000 | B axis acceleration, mm/sec^2. N/A on 2 axis Mini Gerbil controllers |
| $130 | 320.000 | X axis maximum travel distance, millimeters |
| $131 | 230.000 | Y axis maximum travel distance, millimeters |
| $132 | 200.000 | Z axis maximum travel distance, millimeters. N/A on 2 axis Mini Gerbil controllers |
| $133 | 200.000 | A axis maximum travel distance, millimeters. N/A on 2 axis Mini Gerbil controllers |
| $134 | 200.000 | B axis maximum travel distance, millimeters. N/A on 2 axis Mini Gerbil controllers |
You can look up G-code reference websites to see settings for potential tweaking.
Electronic limits do work with smaller pull off distances (between 0.5 and 2.5mm)
If X axis (MG2 – 200mm/sec and MG3 – 400) is too slow you can tweak the speed to higher values. Y axis is usually way slower than the X axis due to the gantry design. Engraving happens across the high speed X axis while the Y axis just do small step increments per engraved line. So tweaking the Y axis does little to increase the engraving process. The default X and Y axis feed rates ($110 and 111) are very conservative values to cater for a big audience of users. Tweaking involves tuning the belt tension as well!
NOTE: $10 needs to be set to 1 (default used to be 31 but it seems not to be supported in LightBurn anymore)
Enjoy experimenting, and if you have not used LightBurn why not download a trial version to use with your Mini Gerbil G-code controller for lasers. You don’t have a Mini Gerbil? Okay head over to our purchase page…
I’ve just purchase the Sainsmart 3018-pro CNC Router. I’m relatively new to CNC controlling. My machine is set up but not working as it should. My ‘Y’ travel is non-existent, the motor just grunts and I’m having difficulty finding out how to change the font size. Can anyone help me solve the problems?
Hi Mike,
Check for mechanical obstructions on Y travel. Can you move it by hand? If so, move it to half way along its travel and then attempt to move it by control.
Which software are you using where you want to change the font size? The software provider is the best person to answer that.
Cheers
Dan
Hi Mike.
This isn’t an answer to your question, but I too just purchased a Sainsmart 3018-pro CNC. I too need help from the manufacturer, but perhaps one of the two responders to you might be able to help or direct me.
I’ve spent hours trying to find a CS email or phone number for Sainsmart. No luck.
My immediate need is for a manual/instructions for their Offline Controller Module for Genmitsu CNC Router — SKU: 101-60-283. Their Learn section of their website has a multitude of manuals/videos, but they do not have the one that I need.
Any chance someone can give me their email/phone number?
talk to lynn at support at sainsmart, she is very good and tell her neil scott suggested that i speak to you as i am having problems, her email is web@sainsmart.com will gt you to support. Be Nice I find you get a lot more done that way OK!!
It’s hard to see any details on the controller and stepper drivers. It can be a defect stepper driver or bad connection or connector. Are you able to get some help from a tech savvy friend?
Since you just bought it, I could ask them for support or send it back to the seller and ask them for a refund. Hope this helps.
Could you expand on how the PWM frequency parameter $28 works?
It looks like it is an integer value range 0 to 15, with each value equaling a specific PMW frequency.
It this correct?
What are the frequencies for each value?
The PWM Spindle frequency can be set via $28 in the firmware
(up to 80kHz for example… 80kHz is configured by issuing a $28=15 command via a G-code sender or in the LB console)
0 = 60 Hz
1 = 120 Hz
2 = 250 Hz
3 = 500 Hz
4 = 1 kHz
5 = 1.5 kHz (configured as default)
6 = 3 kHz
7 = 4.5 kHz
8 = 6 kHz
9 = 8 kHz
10 = 10 kHz
11 = 15 kHz
12 = 30 kHz
13 = 45 kHz
14 = 60 kHz
15 = 80 kHz
So why would you want to change the KHz for? Engraving on different materials?
Not every configuration option has a clear purpose for user application in the final product. Sometimes the configuration options are just to provide technical flexibility during the design process. This is the case with the PWM frequency. We do not recommend changing it, and if we ever find out a good reason to change it, we will blog about it.
Hi guys,
i have a speed problem, when i engrave with more then 150mm/s the start and endpoint is missing “burnmarks” so nothing engraves…it seems that the laser is to slow with on off in that moment… is there a “laser speed” setting?
cheers from germany…
PS: miniGerbil…
Hi Einar,
that’s an interesting problem! A photo would be great to ensure we understand the issue.
Paul has an interesting analysis – the problem could indicate an old laser tube, because the ignition threshold of the tube has increased to the point that the initial power level is not enough to activate it. Lightburn and many laser software decrease power at corners because the movement is slower, so this seems to make sense. To overcome this (until your tube needs complete replacement), try:
a) increasing power level in Lightburn, and/or,
b) change the power range using the $30 setting. Note you need to decrease the range of power (ie. ensure power is more consistently high), so please decrease $30 (power range) from 1000 to 500 and retest. The $30 setting can also be changed through the Lightburn interface, where it is on the Device Settings screen and labelled ‘S-value max’.
Regards,
Dan
thanks for your reply, but the tube is not that old or used…
i can try to make a photo of that problem… maybe i messed up some gerbil settings…
start and end is around 0.5 mm missing… its just in the engraving mode… using the latest lightburn version…
and if you make a tableau over 300mm x 200mm a speed of 150mm is not that fast as 100mm on a piece of 20mm x 20mm, and that works… so the turnover theorie which i had in mind, will not be the problem… i think…
You’re welcome. Actually, best if you start a K40 forum topic on this and include photos of your wiring and the result you are getting. I’ll look out for it and respond
Are these settings retained after power off? or do they need to be setup each time the machine is started? (I know, suck it and see, but I’d rather know from an expert)
The settings are stored in the eeprom part of the processor. So they are retained.