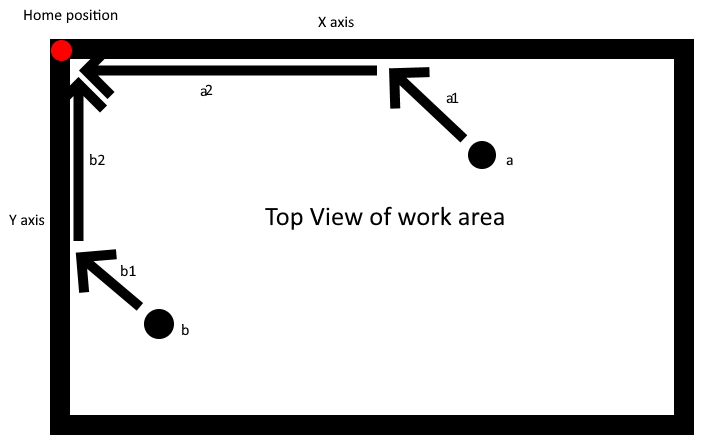
The gcode system doesn’t have an inbuilt diagnostics system, so when helping customers debug their laser system, we need to be a bit creative to work out what’s going on.
Homing is fundamental to gcode, and it requires all of the following to be right to operate correctly:
- Limit Switch wiring and configuration
- Motor wiring and configuration
- Mechanical movement system
We’ve found the quickest way to understand the root cause issue of a homing problem is what we simply call the ‘2 part home at power up’.

The steps are:
a) Turn off your machine
b) By hand, manually drag your laser head into position ‘a’.
c) Turn your laser back on. If you haven’t got ‘auto homing at startup’ turned on, then perform a homing command. This can be done by pressing the home (house) icon in Lightburn, or issuing $h in the console.
d) Observe the results carefully (recording a video can be helpful).
Here are some possible scenarios:
- The ideal scenario – the laser head moves smoothly in the a1 direction, then noiselessly continues in the a2 direction until it arrives at the corner. When in the corner it shuffles away from the corner and then back and stops.
- The wrong direction scenario – The laser head moves in a direction other than the direction a1 even to start with. For whichever axis is going in the wrong direction, change whichever is easier for you – the motor connections or motor configuration.
- The something fundamental scenario – The laser head moves in the a1 direction, but grinding or irregular movement occurs before it gets to the end of the a1 line. This is some kind of movement problem, it could be belt tension, incorrect stepper motor current, or a mechanical obstruction.
- The malfunctioning limit switch scenario – The laser head moves in direction a1 and then makes a grinding sound as it moves along line a2. This indicates the Y limit switch is not functioning. The grinding sound occurs because the Y motor continues to push the laser carriage into the far end of the laser cutter.
- The switcheroo scenario – The laser head moves in direction a1, and stops there for a while, making a continuous grinding sound. This indicates that the limit switch wires are swapped around in their connection to your controller! Why is that? When the a1 movement completes, the controller ‘thinks’ the laser head has hit the left hand side of the workspace, and so turns off the X axis motor. Meanwhile, the Y axis motor remains on, which of course grinds into the far side of the machine.
- The Y-only false homing mis-wiring scenario – From point a, the laser head moves in the a1 direction and when it reaches the end of a1 movement it acts like it has achieved a homing. In contrast, when starting homing from point b, at the end of b1 it grinds until it reaches the end of b2, where it eventually registers a homing. This is because the limit switches are miswired into the Mini Gerbil such that only the Y limit switch is connected to ground and the X can only work when Y is also working. To correct this scenario, note the common grounds must connect to either of the ground contacts on the Mini Gerbil.
- The pull off scenario – The laser head moves along path a1 and a2 without noise or dramas, but a moment after it lands in the home position, it reports an error. This is probably because you have mechanical limit switches rather than the more typical optical (photointerruptor) version. The mechanical version requires a different configuration to reflect its geometry. Simply type $27=4 in the Lightburn console window then press enter. For further information, see https://awesome.tech/limit-switches-and-homing/
- The sorry no movement scenario – There is no movement whatsoever when you operate homing. Very carefully check the large power connector is fully contacting the Mini Gerbil pins. If possible, verify it is supplying 24V and 5V.
You can also try the 2 part home at power up from position b to help deduce the root cause.
Clear as mud?
