
Install went well but issues with Lightburn?
Quote from Norm Dressler on July 23, 2021, 9:52 amI have my mini gerbil board installed and it works fine in Lightburn for moving around, drawing a box, circle, etc. However, when I open a more complex file, like a burn test file, the text looks flipped around, and even some of the graphics flip top to bottom.
When I burn it, it burns upside down in the laser with the graphics messed up and the text reversed.
I know if I select or change the home position in Lightburn, it does some weird stuff too like flips the graphic, or the text, depending on where I put home. I understand home should be top right, which is how I have it set. How do I set it to burn upright and also be able to see the file properly? I'm posting here because I can't be the only one with the issue 🙂 Or am I?
I have my mini gerbil board installed and it works fine in Lightburn for moving around, drawing a box, circle, etc. However, when I open a more complex file, like a burn test file, the text looks flipped around, and even some of the graphics flip top to bottom.
When I burn it, it burns upside down in the laser with the graphics messed up and the text reversed.
I know if I select or change the home position in Lightburn, it does some weird stuff too like flips the graphic, or the text, depending on where I put home. I understand home should be top right, which is how I have it set. How do I set it to burn upright and also be able to see the file properly? I'm posting here because I can't be the only one with the issue 🙂 Or am I?
Quote from dancolwp1974 on July 24, 2021, 10:48 amHi Norm,
You've written above 'top right' but if you have a standard K40, don't you mean TOP LEFT ? The Mini Gerbil is designed to home in the K40's default top left position.
The first half of this blog lays out the various homing positions, coordinates and $ settings: https://awesome.tech/limit-switches-and-homing/ .
As changing homing configurations can be confusing, anything other than top-left homing position should be considered for advanced users only.
Another blog provides more debugging techniques for homing: https://awesome.tech/2-part-home-at-power-up/
It describes specific scenario numbers, to ensure we're on the same page about exactly what symptoms you're seeing. If you're seeing Scenario 2 - wrong directions, your options are to flip the relevant axis connector 180' (assuming it's not a ribbon cable), or change the $ settings as per the previous blog.
If you're replying, please provide your $ values (issue the $$ command and copy and paste), a photo of your controller and power supply wiring, and a photo of the a test engraving of the word 'dog' sitting in your K40 bed. I choose this word because is is asymmetric in x and y directions and therefore it is clear which axes are reversed.
Hope this helps!
Regards,
Dan
Hi Norm,
You've written above 'top right' but if you have a standard K40, don't you mean TOP LEFT ? The Mini Gerbil is designed to home in the K40's default top left position.
The first half of this blog lays out the various homing positions, coordinates and $ settings: https://awesome.tech/limit-switches-and-homing/ .
As changing homing configurations can be confusing, anything other than top-left homing position should be considered for advanced users only.
Another blog provides more debugging techniques for homing: https://awesome.tech/2-part-home-at-power-up/
It describes specific scenario numbers, to ensure we're on the same page about exactly what symptoms you're seeing. If you're seeing Scenario 2 - wrong directions, your options are to flip the relevant axis connector 180' (assuming it's not a ribbon cable), or change the $ settings as per the previous blog.
If you're replying, please provide your $ values (issue the $$ command and copy and paste), a photo of your controller and power supply wiring, and a photo of the a test engraving of the word 'dog' sitting in your K40 bed. I choose this word because is is asymmetric in x and y directions and therefore it is clear which axes are reversed.
Hope this helps!
Regards,
Dan
Quote from Norm Dressler on July 25, 2021, 4:59 amSorry, yes I meant top left.
These are my grbl settings before reading the blog post. You would think I understood this way more than I do since I have a CNC machine and a diode laser both running GRBL (and a couple of 3d printers running klipper). 🙂
- $0=10
- $1=10
- $2=0
- $3=1
- $4=0
- $5=1
- $6=0
- $7=0
- (ATC M6, pulse/ff)
- $8=100
- (ATC Tool Td, milliseconds)
- $9=100
- (ATC M6 Td, milliseconds)
- $10=1
- $11=0.010
- $12=0.002
- $13=0
- $19=0
- (Softstart, milliseconds)
- $20=0
- $21=0
- $22=1
- $23=3
- $24=2000.000
- $25=2000.000
- $26=250
- $27=4.000
- $28=5
- (Spindle freq. 0 to 15)
- $30=1000
- $31=1
- $32=1
- $100=157.000
- (x:stp/mm)
- $101=157.000
- (y:stp/mm)
- $102=160.000
- (z:stp/mm)
- $103=160.000
- (a:stp/mm)
- $104=160.000
- (b:stp/mm)
- $110=12000.000
- (x:mm/min)
- $111=5000.000
- (y:mm/min)
- $112=5000.000
- (z:mm/min)
- $113=5000.000
- (a:mm/min)
- $114=5000.000
- (b:mm/min)
- $120=8000.000
- (x:mm/s^2)
- $121=3000.000
- (y:mm/s^2)
- $122=3000.000
- (z:mm/s^2)
- $123=3000.000
- (a:mm/s^2)
- $124=3000.000
- (b:mm/s^2)
- $130=320.000
- (x:mm max)
- $131=230.000
- (y:mm max)
- $132=200.000
- (z:mm max)
- $133=200.000
- (a:mm max)
- $134=200.000
- (b:mm max)
Sorry, yes I meant top left.
These are my grbl settings before reading the blog post. You would think I understood this way more than I do since I have a CNC machine and a diode laser both running GRBL (and a couple of 3d printers running klipper). 🙂
- $0=10
- $1=10
- $2=0
- $3=1
- $4=0
- $5=1
- $6=0
- $7=0
- (ATC M6, pulse/ff)
- $8=100
- (ATC Tool Td, milliseconds)
- $9=100
- (ATC M6 Td, milliseconds)
- $10=1
- $11=0.010
- $12=0.002
- $13=0
- $19=0
- (Softstart, milliseconds)
- $20=0
- $21=0
- $22=1
- $23=3
- $24=2000.000
- $25=2000.000
- $26=250
- $27=4.000
- $28=5
- (Spindle freq. 0 to 15)
- $30=1000
- $31=1
- $32=1
- $100=157.000
- (x:stp/mm)
- $101=157.000
- (y:stp/mm)
- $102=160.000
- (z:stp/mm)
- $103=160.000
- (a:stp/mm)
- $104=160.000
- (b:stp/mm)
- $110=12000.000
- (x:mm/min)
- $111=5000.000
- (y:mm/min)
- $112=5000.000
- (z:mm/min)
- $113=5000.000
- (a:mm/min)
- $114=5000.000
- (b:mm/min)
- $120=8000.000
- (x:mm/s^2)
- $121=3000.000
- (y:mm/s^2)
- $122=3000.000
- (z:mm/s^2)
- $123=3000.000
- (a:mm/s^2)
- $124=3000.000
- (b:mm/s^2)
- $130=320.000
- (x:mm max)
- $131=230.000
- (y:mm max)
- $132=200.000
- (z:mm max)
- $133=200.000
- (a:mm max)
- $134=200.000
- (b:mm max)
Quote from Norm Dressler on July 25, 2021, 5:02 amFYI. I had gone through that blog post - and the settings are correct both in GRBL and lightburn.
FYI. I had gone through that blog post - and the settings are correct both in GRBL and lightburn.
Quote from dancolwp1974 on July 25, 2021, 1:06 pmHi Norm,
Thanks for the confirmation of top-left and $ settings. Yes, $ settings look ok, but please revert $1=255 This is our recommended value and the value we provide support for.
Next steps are:
- Confirm you are experiencing Scenario 2 as defined in https://awesome.tech/2-part-home-at-power-up/
- Provide a photo of your controller and power supply wiring,
- Provide a photo of the a test engraving of the word 'dog' sitting in your K40 bed. I choose this word because is is asymmetric in x and y directions and therefore it is clear which axes are reversed.
Thanks
Dan
Hi Norm,
Thanks for the confirmation of top-left and $ settings. Yes, $ settings look ok, but please revert $1=255 This is our recommended value and the value we provide support for.
Next steps are:
- Confirm you are experiencing Scenario 2 as defined in https://awesome.tech/2-part-home-at-power-up/
- Provide a photo of your controller and power supply wiring,
- Provide a photo of the a test engraving of the word 'dog' sitting in your K40 bed. I choose this word because is is asymmetric in x and y directions and therefore it is clear which axes are reversed.
Thanks
Dan
Quote from Norm Dressler on July 26, 2021, 2:15 amIn fact my machine homes just fine. If I import a picture, it prints as expected. I think the printer and board is configured ok. This is a lightburn issue it seems because when I load a pre-existing file containing text and graphics, either the graphics gets flipped horizontally or the text gets flipped.
I can type out 'dog' and it engraves fine. I import a graphic, and it prints fine.
Perhaps I should enquire over on Lightburn to see if anyone has suggestions there.
Norm
In fact my machine homes just fine. If I import a picture, it prints as expected. I think the printer and board is configured ok. This is a lightburn issue it seems because when I load a pre-existing file containing text and graphics, either the graphics gets flipped horizontally or the text gets flipped.
I can type out 'dog' and it engraves fine. I import a graphic, and it prints fine.
Perhaps I should enquire over on Lightburn to see if anyone has suggestions there.
Norm
Quote from Norm Dressler on July 26, 2021, 2:22 amIn fact my machine homes just fine. If I import a picture, it prints as expected. I think the printer and board is configured ok. This is a lightburn issue it seems because when I load a pre-existing file containing text and graphics, either the graphics gets flipped horizontally or the text gets flipped.
I can type out 'dog' and it engraves fine. I import a graphic, and it prints fine.
Perhaps I should enquire over on Lightburn to see if anyone has suggestions there.
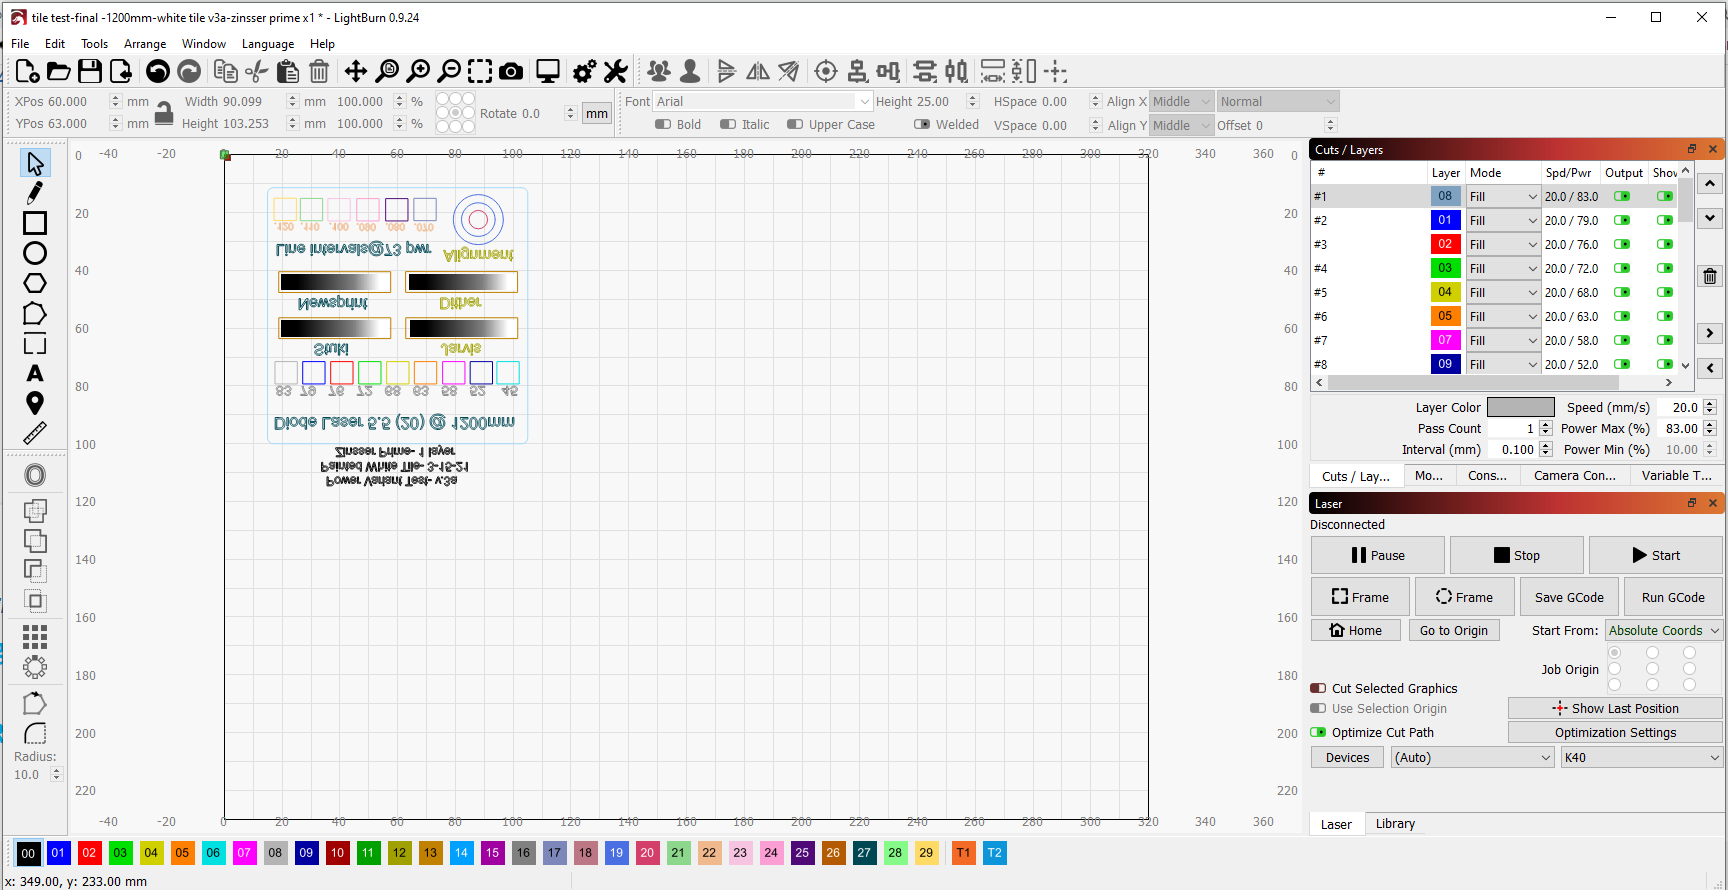
Attached, screengrabs - first file on a generic grbl machine, home bottom left, image is as it should be.
Image 2 - k40 configuration, home top left, grbl-stm, image inverts.
In fact my machine homes just fine. If I import a picture, it prints as expected. I think the printer and board is configured ok. This is a lightburn issue it seems because when I load a pre-existing file containing text and graphics, either the graphics gets flipped horizontally or the text gets flipped.
I can type out 'dog' and it engraves fine. I import a graphic, and it prints fine.
Perhaps I should enquire over on Lightburn to see if anyone has suggestions there.
Attached, screengrabs - first file on a generic grbl machine, home bottom left, image is as it should be.
Image 2 - k40 configuration, home top left, grbl-stm, image inverts.
Uploaded files: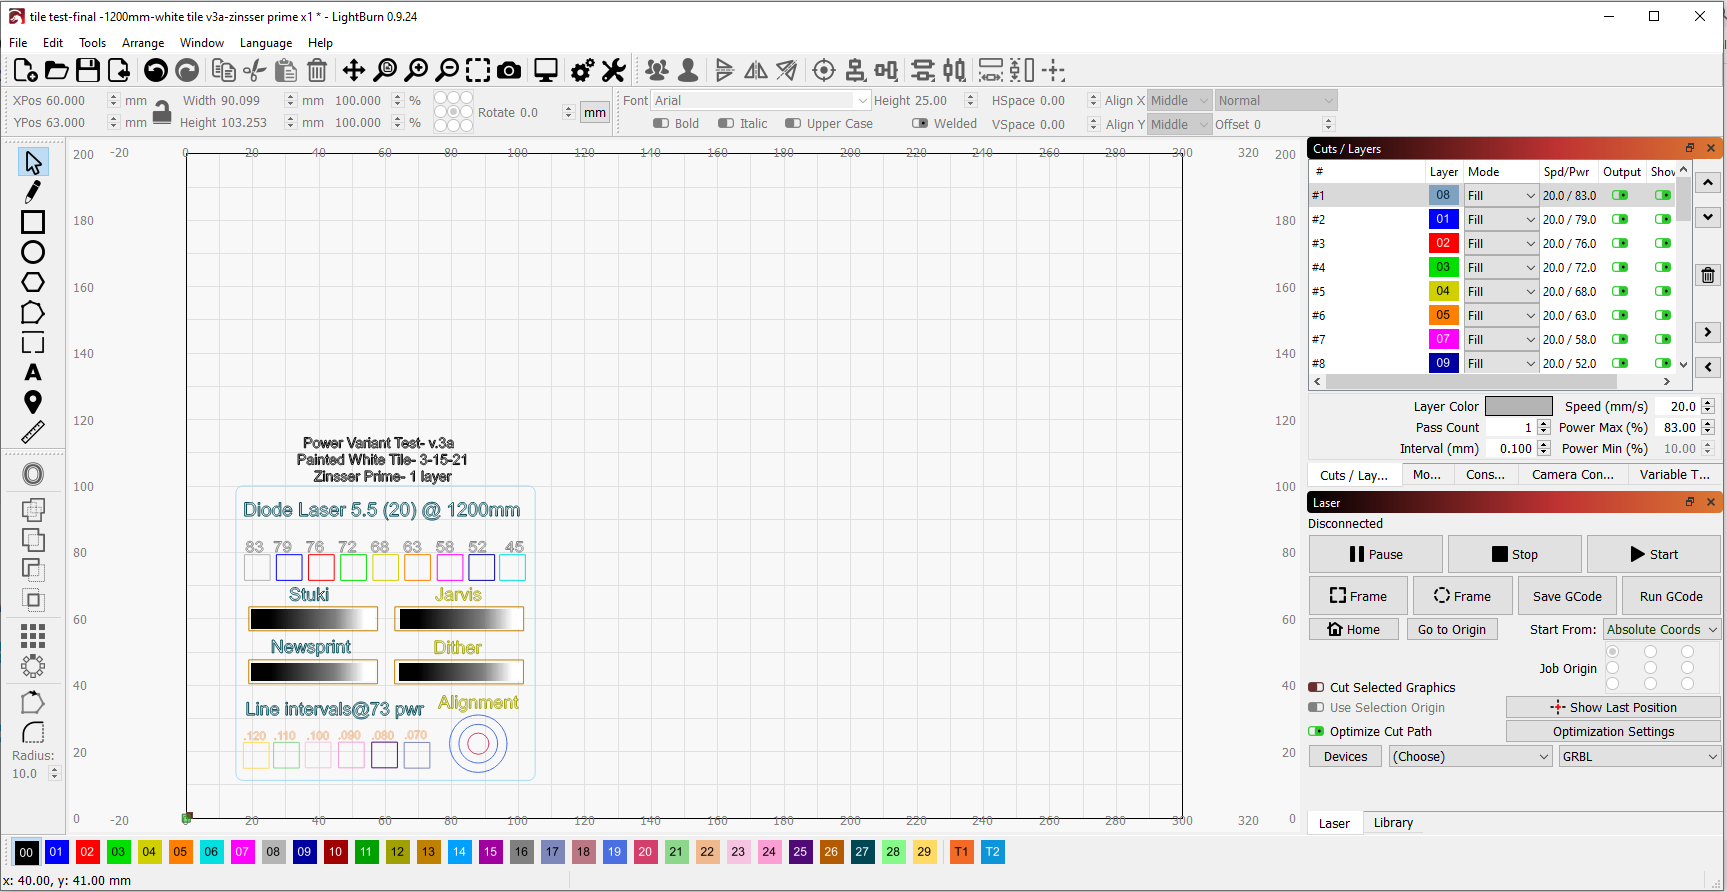
Quote from Norm Dressler on August 18, 2021, 12:40 amJust to close this off, I asked the question in Lightburn and was surprised by the answer, but it works. Top left for config and starting position.
If image comes in flipped or wrong, use Lightburn to flip the image so it looks ok on the screen. I've done that and it burns/cuts perfectly. Not sure why this is really a problem but at least there is a solution.
Just to close this off, I asked the question in Lightburn and was surprised by the answer, but it works. Top left for config and starting position.
If image comes in flipped or wrong, use Lightburn to flip the image so it looks ok on the screen. I've done that and it burns/cuts perfectly. Not sure why this is really a problem but at least there is a solution.
Quote from dancolwp1974 on August 18, 2021, 10:37 pmThanks for the update Norm.
Thanks for the update Norm.
Quote from Brigg Trim on August 30, 2021, 6:08 pmHi....At the point when you are in Lightburn peer down at the base right hand side. Where it says "Gadgets" It should show your gadget. On the off chance that it doesn't tap on "Gadgets" and check whether the arrangement is still there for your Laser, assuming this is the case click on it, assuming not, reinstall it. Do this while the Laser is turned on and associated by means of USB ( in case that is the thing that you use).
Hi....At the point when you are in Lightburn peer down at the base right hand side. Where it says "Gadgets" It should show your gadget. On the off chance that it doesn't tap on "Gadgets" and check whether the arrangement is still there for your Laser, assuming this is the case click on it, assuming not, reinstall it. Do this while the Laser is turned on and associated by means of USB ( in case that is the thing that you use).
Quote from dancolwp1974 on August 31, 2021, 10:12 amHi Brigg,
thanks for sharing the tip. I gather you're translating - the English version 0.9.24 I have uses the word 'Devices'.
Regards,
Dan
Hi Brigg,
thanks for sharing the tip. I gather you're translating - the English version 0.9.24 I have uses the word 'Devices'.
Regards,
Dan