
Yes, you can use air assist with your Mini Gerbil. Read on for background and how-to.
What is air assist?
Air assist is the use of artificial airflow to reduce the built up or smoke and residue on your optical lens and workpiece. This article has a more detailed description.
There are multiple ways to implement air assist:
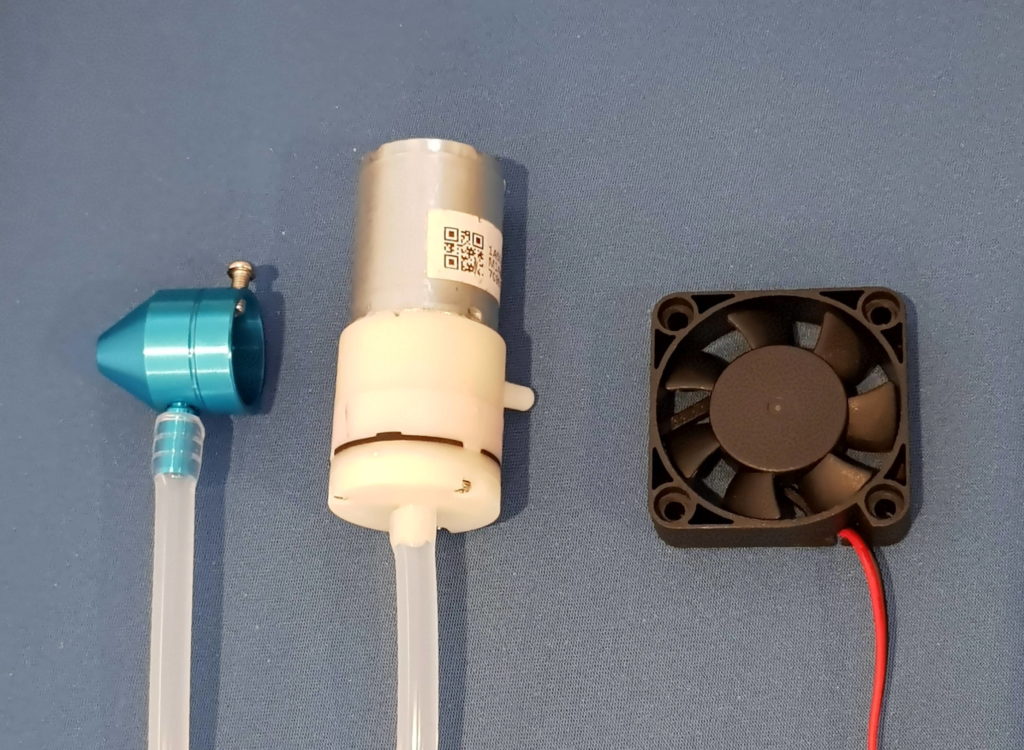
- Small DC powered fans and air-pumps – small fans or air pumps that run on low voltages are quiet enough to run continuously without being a disturbance. Awesome.Tech’s recommendation is that such devices be turned on manually from a separate supply, or run directly from the 5V or 24V output of the laser power if they don’t use much power. This is a lot simpler than operating via a controller!
- Small AC (mains) powered fans and air-pumps – these devices are similar to the DC powered small fans and air-pumps, but are AC mains powered.
- Compressors (AC mains powered) – Most types of compressors can’t run continuously, and in any case, compressor outputs are too high pressure for direct laser use. So an air regulator is required to drop the pressure to a low pressure continuous output, such as 25psi.
Apart from small DC powered devices that can be left on continuously, it’s desirable to switch the air-assist function on and off from the controller. The laser software (such as Lightburn) allows the air assist to be turned on and off, either via the user interface, or programmatically in the g-code. Note the control is simply on or off – speed control is not supported.
History and availability of the Air Assist output
Mini Gerbils versions v1.1 to v2 didn’t support an Air Assist function using their original factory-supplied firmware.
The original Mini Gerbil design included a Fault output function, which sent a HIGH output signal in the event of the microcontroller or firmware error. However Awesome.Tech understands no users utilised this feature and it is redundant.
So to cater for interest in Air Assist, in Mini Gerbil firmware 12353 Awesome.Tech re-assigned the Fault output function to act as Air Assist. This explains why the relevant connection on the Mini Gerbil is labelled ‘Fault’.
How to setup air assist functionality
Solid State Relays (SSR) use a low voltage and current signal (DC) from the Mini Gerbil to switch a higher voltage or current. As the output can be DC or AC, there are two types of SSRs: DC to DC types, and DC to AC types.
The setup for both types of SSR are covered below:
Controlling a low voltage DC solenoid valve
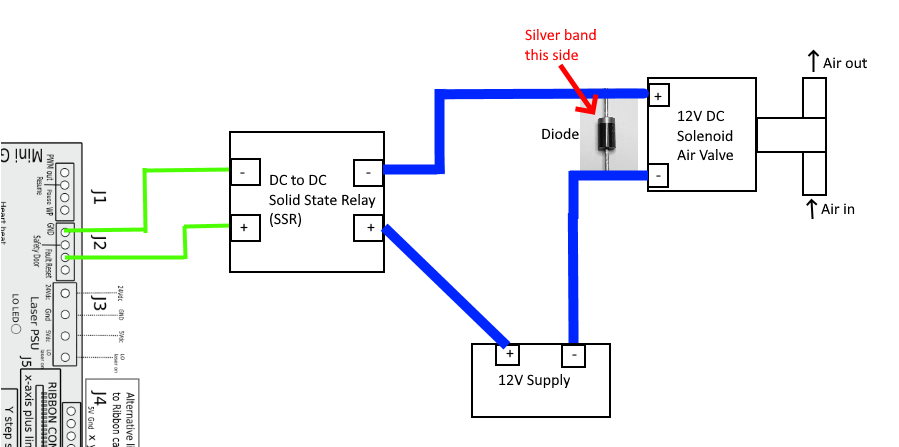
A DC to DC Solid State Relay (SSR) controls the low pressure air by operating a 12V or 24C DC solenoid valve. An indicative installation is shown below.
Note the use of a snubber diode to dissipate back EMF caused by solenoid operation. A 1N4007 diode is suitable – actually overkill for the use shown here, but avoids specifying different diodes for different cases. The polarity of the diode must be correct, with the silver band attached to the positive lead of the solenoid.
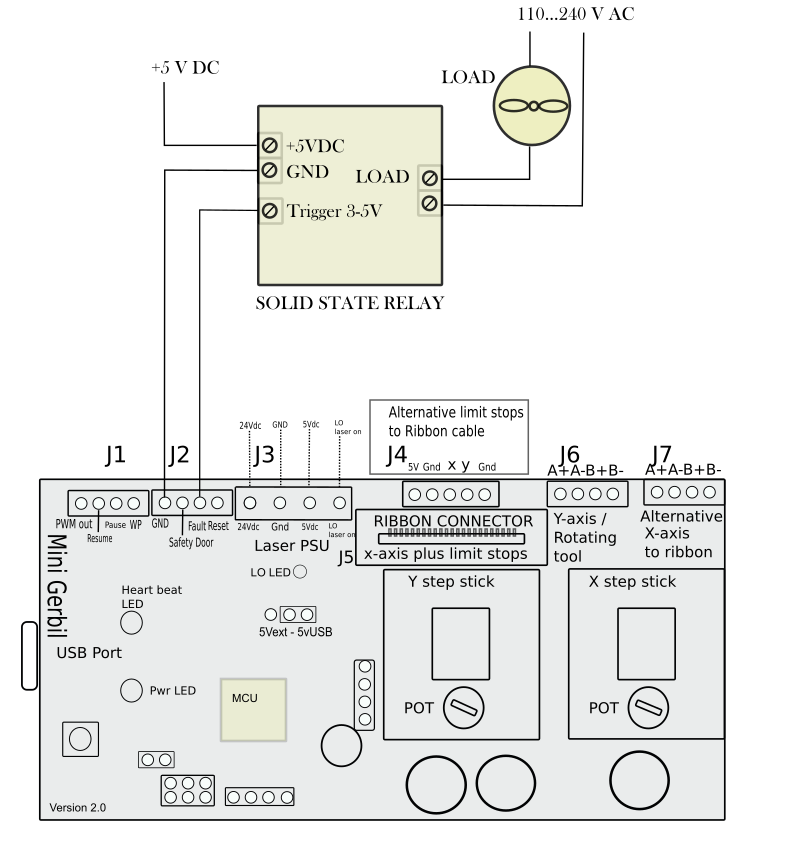
Controlling a mains voltage AC device directly
For small AC powered devices, such as a mains-powered aquatic pump, the whole device could be controlled directly at mains level. Note that this strategy involves dealing with mains voltage, and should only be done by suitably qualified and experienced people. Turning on and off larger AC powered devices, such as air-compressors, is not recommended as they haven’t been designed to be turned on and off frequently.
A DC to AC SSR is required. It is NOT suitable to use a DC to DC SSR, even if the DC voltage switching capability it higher than the AC power to be used.
Note that some Solid State Relays have five terminals, as shown in the digram below. If applicable, the 5V DC supply should also be wired into the common input ground on the Left Hand Side.
Selecting a Solid State Relay
If the solid state relay draws more than 25mA the Mini Gerbil will be damaged, so please leave a safety margin by sourcing a suitable SSR requiring up to 20mA maximum control current. Before connecting the SSR to your Mini Gerbil, test it by applying a 3.3V signal to the input terminals and checking it operates as intended.
Note that some solid state relay models are inverting (low input causes output to operate), which is generally unsuitable.
Older style coil-relays are unsuitable because they (pretty much always) require much more than 3.3V to toggle the output.
How to use air assist functionality
To turn on the air assist:
- send a M8 command via the console, or
- send g-code that includes a M8, or
- toggle the Air button on in the Lightburn cuts/layers interface
To turn off the air assist:
- send a M9 command via the console, or
- send a M9 command via g-code, or
- toggle the Air button off in the Lightburn cuts/layers interface
It is possible to configure Lightburn so that it automatically turns on air assist at the start of a g-code program and turns it off at the end of the g-code program.
Can I also use a standard relay as alternativ to the SSR ? I use these normally with my arduinos as well
Sorry, 25mA is not enough to drive a traditional coil relay. SSR’s are geared for switching mains loads so they are the focus.
Hi I am trying to connect my air assist using a 3V DC + Trigger SSR. I have wired it up but the reverse is happening. M8 Turns it off, M9 turns in on. Is it my relay and if so could you recommend I SSR to buy. Regards Graham
Hi Graham, a few questions:
* what SSR did you use? Please send a link
* please confirm you have an MG v2 or higher
* when you type $i in the console (report firmware version), what does it say?
Cheers
Dan
Is this working?
Halbleiterrelais Einphasiges DC AC SSR-40DA 40A 3-32 V DC / 24-380 V AC Halbleiterrelais Modul https://www.amazon.de/dp/B07HB3JXGG/ref=cm_sw_r_cp_api_glt_i_Q8ESSAP51CRFPA5TX4V0
Hi Robin,
I’ve updated the article to describe switching low voltage DC and mains AC loads. Your link’s SSR appears suitable for switching mains AC loads, but please read the updated article above for guidance.
Cheers
Dan