
using shield with stock R3
Quote from jaredeh on December 1, 2018, 1:58 amMy gerbil arduino board burned out. I was hoping to be able to use a stock Arduino right now so I can get my laser up and running again. How do I go about doing that?
My gerbil arduino board burned out. I was hoping to be able to use a stock Arduino right now so I can get my laser up and running again. How do I go about doing that?
Quote from Paul on December 3, 2018, 1:06 amHi, you can indeed use the K40 shield with a standard UNO R3. The only thing you need to set is the PWM output port. In the standard Uno, they use D11 which corresponds with Jumper Timer2 on the shield. Only one jumper for the PWM should be bridged. So leave the two other jumpers Timer3 and 4 open.
Also be aware that the standard Uno has only 8 bits pwm which means 255 values over the full power range. Which leaves you with just 3 or 4 shades of grey in the 2mA region.
So if I may ask, what happened to the board? Anything I can do to help?
cheers, Paul
Hi, you can indeed use the K40 shield with a standard UNO R3. The only thing you need to set is the PWM output port. In the standard Uno, they use D11 which corresponds with Jumper Timer2 on the shield. Only one jumper for the PWM should be bridged. So leave the two other jumpers Timer3 and 4 open.
Also be aware that the standard Uno has only 8 bits pwm which means 255 values over the full power range. Which leaves you with just 3 or 4 shades of grey in the 2mA region.
So if I may ask, what happened to the board? Anything I can do to help?
cheers, Paul
Quote from dat-alex on February 19, 2019, 9:16 pmHi Paul!
I am going to use K40 shield with (old)arduino uno R3 .
My power supply is one of the OLD style
Do you think I will have a pwm laser supported?
Thank you for your time,
Alex
Hi Paul!
I am going to use K40 shield with (old)arduino uno R3 .
My power supply is one of the OLD style
Do you think I will have a pwm laser supported?
Thank you for your time,
Alex
Uploaded files:
Quote from Paul on February 20, 2019, 9:12 amHi Alex, yes you can use the legacy K40 shield with a standard R3 Uno. However you need to set the PWM jumper on the shield to Timer2 (Arduino port D11). The other jumpers Timer3 and 4 need to be open since R3 does not have these ports (used on the R4 controller board).
Also note that the pwm on the R3 is just 255 levels. Engraving is not going to be well unless you use just B/W. Cutting however seems to be work well with 255 levels (8 bits resolution).
Hi Alex, yes you can use the legacy K40 shield with a standard R3 Uno. However you need to set the PWM jumper on the shield to Timer2 (Arduino port D11). The other jumpers Timer3 and 4 need to be open since R3 does not have these ports (used on the R4 controller board).
Also note that the pwm on the R3 is just 255 levels. Engraving is not going to be well unless you use just B/W. Cutting however seems to be work well with 255 levels (8 bits resolution).
Quote from dat-alex on February 20, 2019, 4:38 pmHi Paul,
First I would like to thank you for your quick response.
I have already read your first reply to jaredeh .
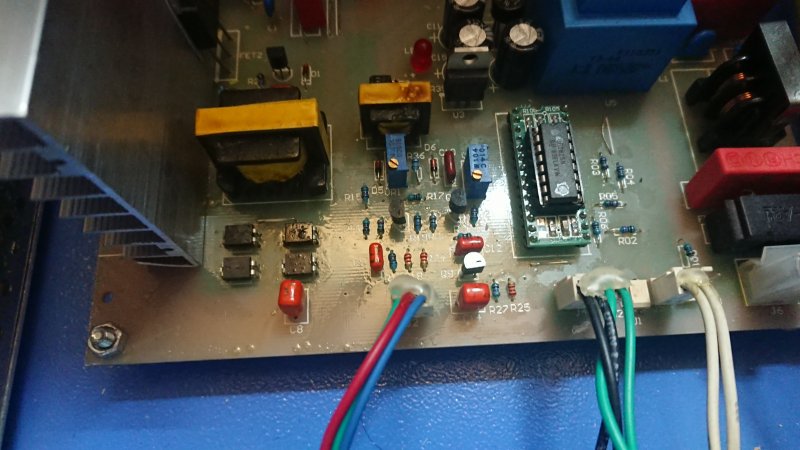
My actual quetion was that if you know if I can use pwm option on my (see photo above) Laser Power Supply as it is of the 'old' vertion?
See you
Alex
Hi Paul,
First I would like to thank you for your quick response.
I have already read your first reply to jaredeh .
My actual quetion was that if you know if I can use pwm option on my (see photo above) Laser Power Supply as it is of the 'old' vertion?
See you
Alex
Quote from Paul on February 20, 2019, 7:07 pmHi Alex, yes it should work, just follow the potmeter middle lead to the PSU board which is the PWM input. Disconnect that wire and connect the arduino pwm output to it. There is a little label (silkscreen) on the shield ('PWM to laser psu').
Hi Alex, yes it should work, just follow the potmeter middle lead to the PSU board which is the PWM input. Disconnect that wire and connect the arduino pwm output to it. There is a little label (silkscreen) on the shield ('PWM to laser psu').
Quote from dat-alex on February 26, 2019, 6:47 pmHi Paul. Can I use this hex for ArduinoUNO R3 board ?
I have uploaded with XLOADER successfully but I get no serial data when connected to usb arduino port with a terminal. For example $$ gives me nothing.
Thank you for your time
Alex
Hi Paul. Can I use this hex for ArduinoUNO R3 board ?
I have uploaded with XLOADER successfully but I get no serial data when connected to usb arduino port with a terminal. For example $$ gives me nothing.
Thank you for your time
Alex
Quote from Paul on February 26, 2019, 7:18 pmHi alex, that hex file is written specific for the R4 which uses a different processor than the R3. You need to load the R3 code from github.com
Also you need to set the serial communication jumpers back in the position for the R3. The silk screen probably says something like uart 0.
Also bridge the jumper for timer2 for the pwm.
Cheers Paul
Hi alex, that hex file is written specific for the R4 which uses a different processor than the R3. You need to load the R3 code from github.com
Also you need to set the serial communication jumpers back in the position for the R3. The silk screen probably says something like uart 0.
Also bridge the jumper for timer2 for the pwm.
Cheers Paul
Quote from dat-alex on February 26, 2019, 7:32 pmPaul thank you my friend you are so informative and helping me out!
I imagined so about the difference between R3 vs R4 (pb version) but I cannot locate the code for R3
Doy you mean the generic code of GRBL?
https://github.com/gnea/grbl/releases
????
Paul thank you my friend you are so informative and helping me out!
I imagined so about the difference between R3 vs R4 (pb version) but I cannot locate the code for R3
Doy you mean the generic code of GRBL?
https://github.com/gnea/grbl/releases
????
Quote from dat-alex on February 26, 2019, 7:58 pmSuccess (at last!) Now I have communication with my sheild & R3.
One small question-though : Giving $$ I noticed every parameter is there except $28 (pwm) maybe this is due to fw 1.1f does not support this feature?
Success (at last!) Now I have communication with my sheild & R3.
One small question-though : Giving $$ I noticed every parameter is there except $28 (pwm) maybe this is due to fw 1.1f does not support this feature?
Quote from Paul on February 26, 2019, 8:03 pmYes a lot of customisation went into the R4 firmware. Sorry you might need to play around a bit with the gnea code to change the pwm frequency .
Yes a lot of customisation went into the R4 firmware. Sorry you might need to play around a bit with the gnea code to change the pwm frequency .
Quote from dat-alex on February 26, 2019, 8:12 pmok I see.. Thank you very much Paul for your quick responses . Have a nice.... evening (!?)
(Here in Europe is morning actually!)
ok I see.. Thank you very much Paul for your quick responses . Have a nice.... evening (!?)
(Here in Europe is morning actually!)
Quote from Arnold Nov on April 7, 2019, 1:11 amHi Paul,
It looks like I had a similar problem to the original poster here. My gerbil Arduino board suddenly stopped responding via usb. No visible issues, nothing I tried brought it back. This was about 1 year after first operation.
I installed a stock Arduino, but I believe the larger USB port case ended up shorting out one of the end stops which has pins on the Gerbil board above it 🙁
Any ideas on how to fix the Gerbil Arduino board?
Any suggestions on end stop replacement? I'm working from this page: http://donsthings.blogspot.com/2016/06/k40-optical-endstops.html
Hi Paul,
It looks like I had a similar problem to the original poster here. My gerbil Arduino board suddenly stopped responding via usb. No visible issues, nothing I tried brought it back. This was about 1 year after first operation.
I installed a stock Arduino, but I believe the larger USB port case ended up shorting out one of the end stops which has pins on the Gerbil board above it 🙁
Any ideas on how to fix the Gerbil Arduino board?
Any suggestions on end stop replacement? I'm working from this page: http://donsthings.blogspot.com/2016/06/k40-optical-endstops.html
Quote from Paul on May 15, 2019, 4:09 pmHi Arnold, the firmware is written for a different processor (328PB) than the Arduino Uno (328P). The 328PB has two uarts instead of one and this is remapped on the shield to free up the 16 bits PWM port. So you need to re-flash it with the hex file from our downloads page or here https://github.com/paulusjacobus/awesome.tech
Hi Arnold, the firmware is written for a different processor (328PB) than the Arduino Uno (328P). The 328PB has two uarts instead of one and this is remapped on the shield to free up the 16 bits PWM port. So you need to re-flash it with the hex file from our downloads page or here https://github.com/paulusjacobus/awesome.tech