
Homing Stops at Y Limit
Quote from Tom Lehman on November 23, 2020, 5:20 amI have the same issue that other users have reported whereby as soon as the Y limit is reached the homing cycle stops:
https://awesome.tech/k40-forum/topic/homing-not-working-correct/
This happens every time if it's closer to the the Y limit than the X. If it hits the X limit first it homes correctly every time.
I have mechanical switches and set to a 4mm pull-off but I've tried adjusting this and the debounce time, which is at 250 (and will go lower but no higher).
I've switched boards several times and the Nano homes perfectly every time, so definitely not a physical problem with the switches.
Would love to get this resolved because it's annoying having to home, manually move down then re-home every time.
I have the same issue that other users have reported whereby as soon as the Y limit is reached the homing cycle stops:
https://awesome.tech/k40-forum/topic/homing-not-working-correct/
This happens every time if it's closer to the the Y limit than the X. If it hits the X limit first it homes correctly every time.
I have mechanical switches and set to a 4mm pull-off but I've tried adjusting this and the debounce time, which is at 250 (and will go lower but no higher).
I've switched boards several times and the Nano homes perfectly every time, so definitely not a physical problem with the switches.
Would love to get this resolved because it's annoying having to home, manually move down then re-home every time.
Quote from Dan on November 23, 2020, 11:28 pmHi Tom,
thanks for the clear write-up - makes it much easier to help.
I'm assuming you would have told me if you had done any editing of the configuration settings. (ie. $ settings other than pull off and debounce time)
Since when the homing hits the X axis first the homing completes ok, then it seems not so much a case of the Y limit switch not working at all, but a matter of the two limit switches not working in some combination. My guess is that this is an electrical problem caused by a bad connection.
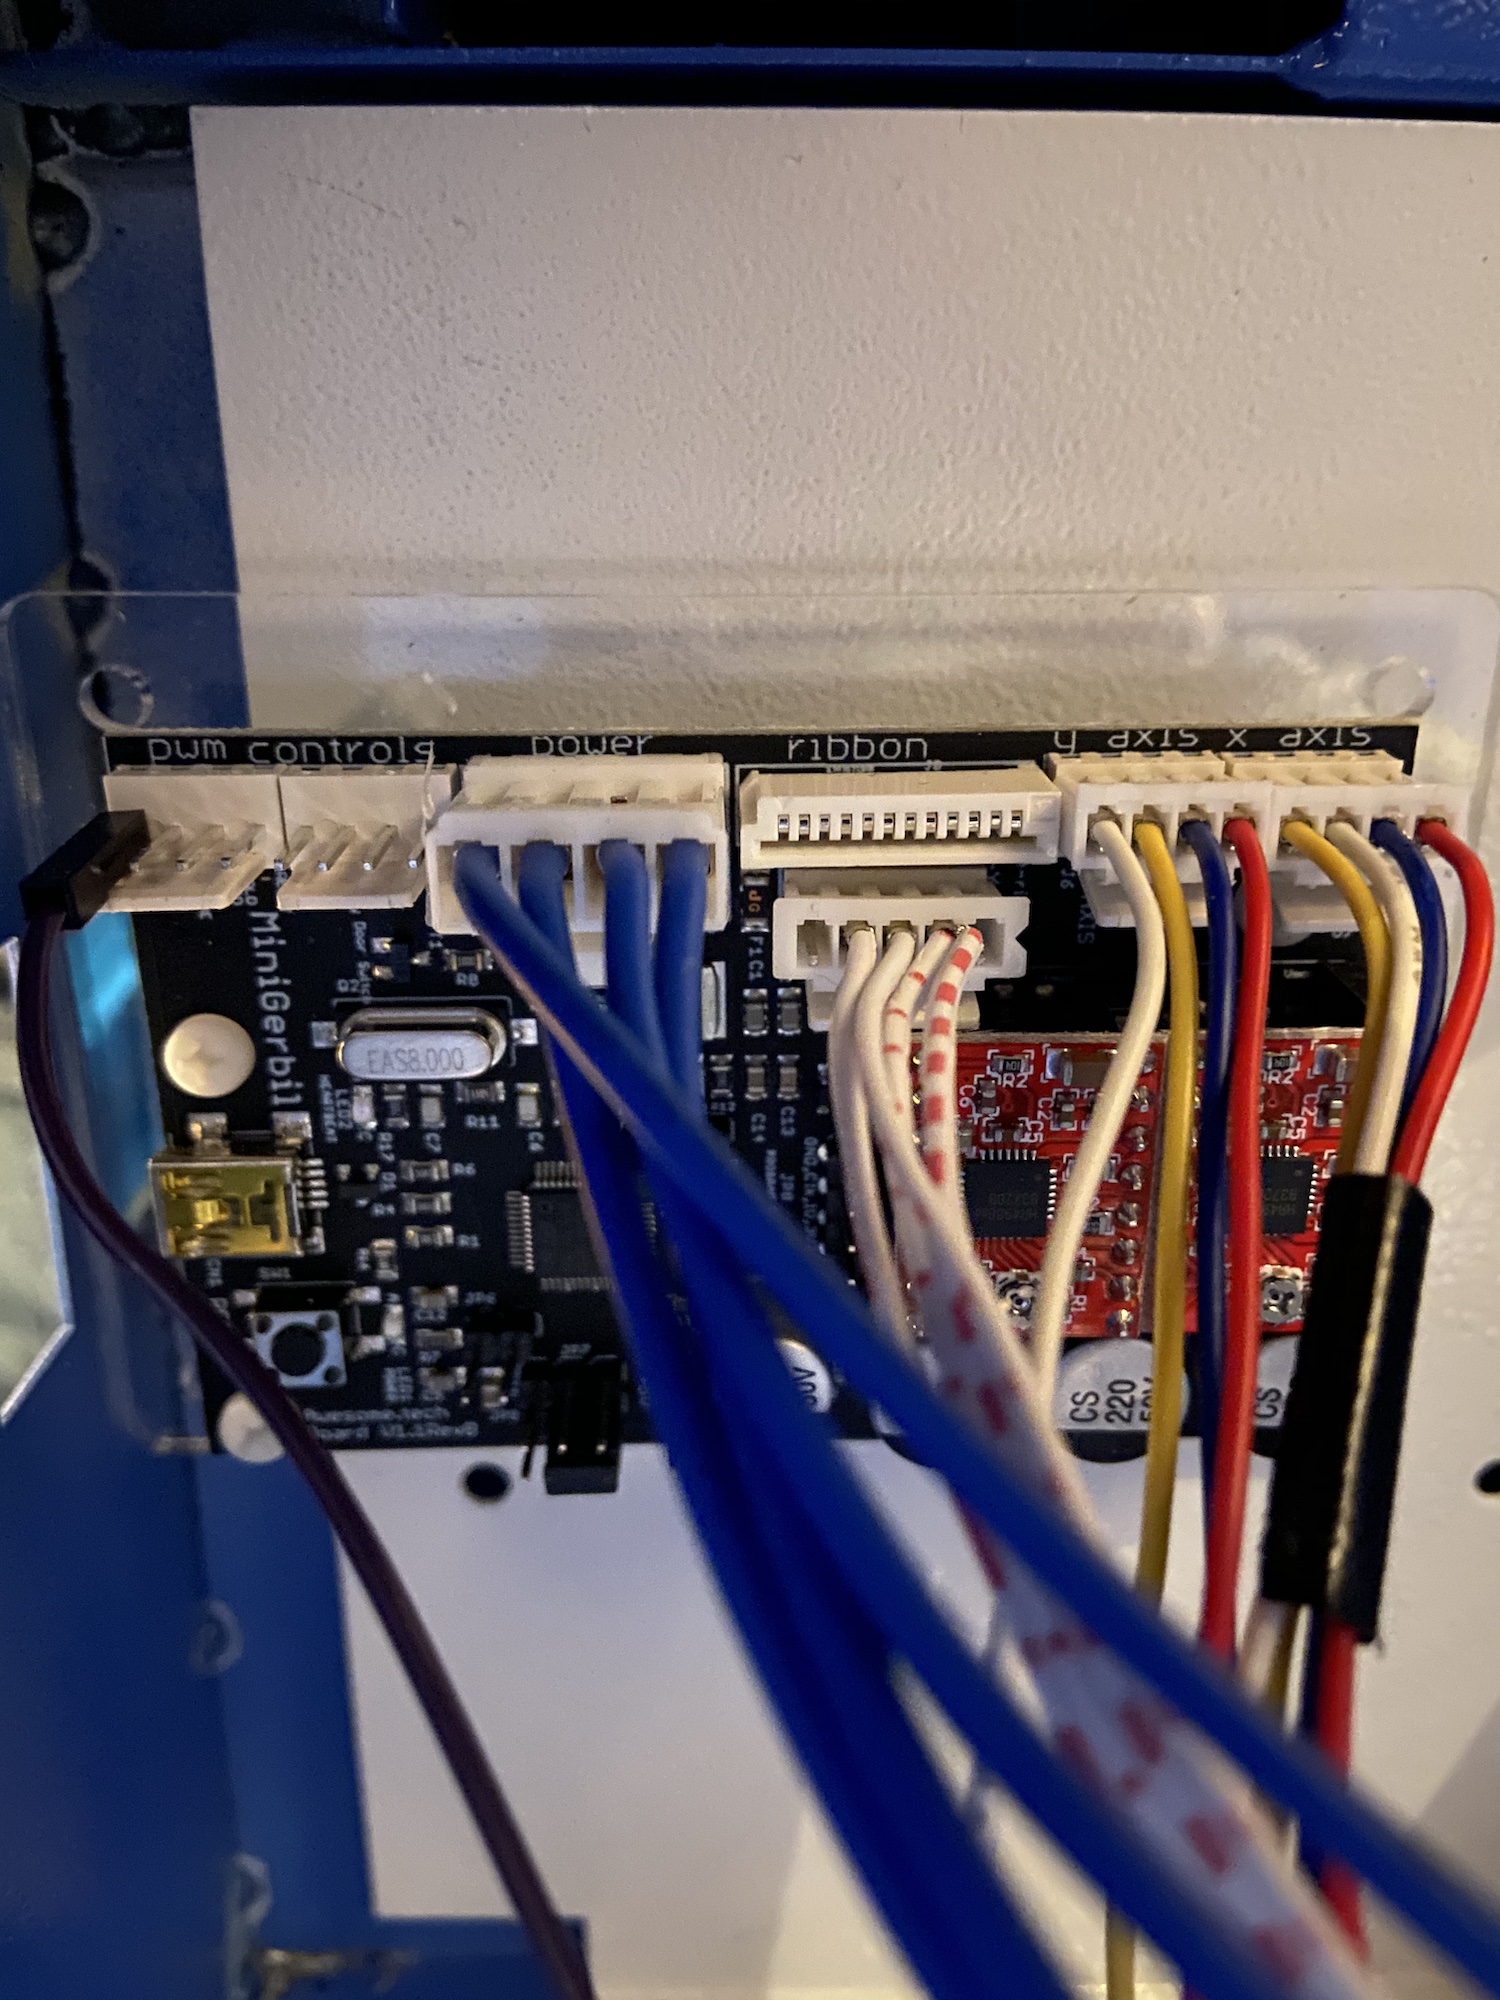
Could you attached a photo of your mini Gerbil, ensuring that your limit switch connectors are in focus...
Thanks
Dan
Hi Tom,
thanks for the clear write-up - makes it much easier to help.
I'm assuming you would have told me if you had done any editing of the configuration settings. (ie. $ settings other than pull off and debounce time)
Since when the homing hits the X axis first the homing completes ok, then it seems not so much a case of the Y limit switch not working at all, but a matter of the two limit switches not working in some combination. My guess is that this is an electrical problem caused by a bad connection.
Could you attached a photo of your mini Gerbil, ensuring that your limit switch connectors are in focus...
Thanks
Dan
Quote from Tom Lehman on December 1, 2020, 4:45 amThanks for the quick response Dan and sorry it's taken so long to get back to you with the photo.
I've changed acceleration, max speed and PWM $ settings too but that is more recent and it's been behaving like this since day one.
It's a strange one because the X limit works 100% of the time and the Y limit works 100% of the time, it's just if the Y limit is reached first it stops there and never attempts to reach the X limit.
Tested at the connector on a meter and works perfectly on the Nano so don't think it can be an issue with the switches or wiring.
Is it worth re-flashing the board?
Thanks for the quick response Dan and sorry it's taken so long to get back to you with the photo.
I've changed acceleration, max speed and PWM $ settings too but that is more recent and it's been behaving like this since day one.
It's a strange one because the X limit works 100% of the time and the Y limit works 100% of the time, it's just if the Y limit is reached first it stops there and never attempts to reach the X limit.
Tested at the connector on a meter and works perfectly on the Nano so don't think it can be an issue with the switches or wiring.
Is it worth re-flashing the board?
Uploaded files:Quote from dancolwp1974 on December 1, 2020, 9:44 pmG'day Tom,
ok, thanks for the further info. If you're up for it, let's go to the next level of detail on this and get it sorted.
Are you able to trace the connections from each of the 4 red and white wires in the limit switch connector? Annoyingly all 4 wires look identical so you'll need to jiggle them carefully to trace them to their destination correctly. If you could sketch up on paper a diagram showing the limit switch plug all the way to the limit switches, that'd be great.
My suspicion is that there's some miswiring there - I've seen similar sort of issues with limit switch wiring errors.
Can you also check/follow the following please:
https://awesome.tech/k40-laser-grounding-instructions/
Regards,
Dan
G'day Tom,
ok, thanks for the further info. If you're up for it, let's go to the next level of detail on this and get it sorted.
Are you able to trace the connections from each of the 4 red and white wires in the limit switch connector? Annoyingly all 4 wires look identical so you'll need to jiggle them carefully to trace them to their destination correctly. If you could sketch up on paper a diagram showing the limit switch plug all the way to the limit switches, that'd be great.
My suspicion is that there's some miswiring there - I've seen similar sort of issues with limit switch wiring errors.
Can you also check/follow the following please:
https://awesome.tech/k40-laser-grounding-instructions/
Regards,
Dan
Quote from Tom Lehman on December 3, 2020, 4:22 amThanks Dan. Had a look and the grounding is all good. I had heard horror stories when I bought it so one of the first things I checked but just run through this again to be sure.
Fortunately the limit wiring is labelled on mine so quite easy to trace. Looking top down it's:
1- n/c
2- X & Y
3- X
4- Y
5- n/c
Thanks,
Tom
Thanks Dan. Had a look and the grounding is all good. I had heard horror stories when I bought it so one of the first things I checked but just run through this again to be sure.
Fortunately the limit wiring is labelled on mine so quite easy to trace. Looking top down it's:
1- n/c
2- X & Y
3- X
4- Y
5- n/c
Thanks,
Tom
Quote from dancolwp1974 on December 3, 2020, 10:03 pmHi Tom,
thanks for the update. Put it this way: Looking at the 5 pin connector with the red and white striped wires below in your photo below
I can see that from left to right there is:
N/C
single wire
single wire
two wires
N/C
However, the 'two wires' is in fact the ground line, so all you need to do is remove the plug, rotate it 180 degrees and reinsert so that, from left to right in the above photo it shows:
N/C
two wires
single wire
single wire
N/C
That way, the two wires will line up with the GND marking on the Mini Gerbil.
Regards,
Dan
Hi Tom,
thanks for the update. Put it this way: Looking at the 5 pin connector with the red and white striped wires below in your photo below
I can see that from left to right there is:
N/C
single wire
single wire
two wires
N/C
However, the 'two wires' is in fact the ground line, so all you need to do is remove the plug, rotate it 180 degrees and reinsert so that, from left to right in the above photo it shows:
N/C
two wires
single wire
single wire
N/C
That way, the two wires will line up with the GND marking on the Mini Gerbil.
Regards,
Dan
Quote from Tom Lehman on December 6, 2020, 3:07 amWell, don't I feel like an idiot!
There's a tab on the board that lines up with the grooved on the connector in the original orientation, so it never occurred to me that it could be the wrong way round. I was convinced that since both stops were working independently that it had to be software-related.
Thanks a lot for you help Dan. Great to have that resolved at last.
Well, don't I feel like an idiot!
There's a tab on the board that lines up with the grooved on the connector in the original orientation, so it never occurred to me that it could be the wrong way round. I was convinced that since both stops were working independently that it had to be software-related.
Thanks a lot for you help Dan. Great to have that resolved at last.