
Correct wiring? Error:9 Alarm:8 in Lightburn
Quote from Shanx on June 25, 2019, 2:54 amHiya,
I'm a bit stuck with the installation of the mini gerbil.
Is this the correct wiring? I can't seem to get lightburn to work with the board and I don't know what I'm doing wrong? It doesn't seem obvious.
Please help 🙂
Hiya,
I'm a bit stuck with the installation of the mini gerbil.
Is this the correct wiring? I can't seem to get lightburn to work with the board and I don't know what I'm doing wrong? It doesn't seem obvious.
Please help 🙂
Uploaded files: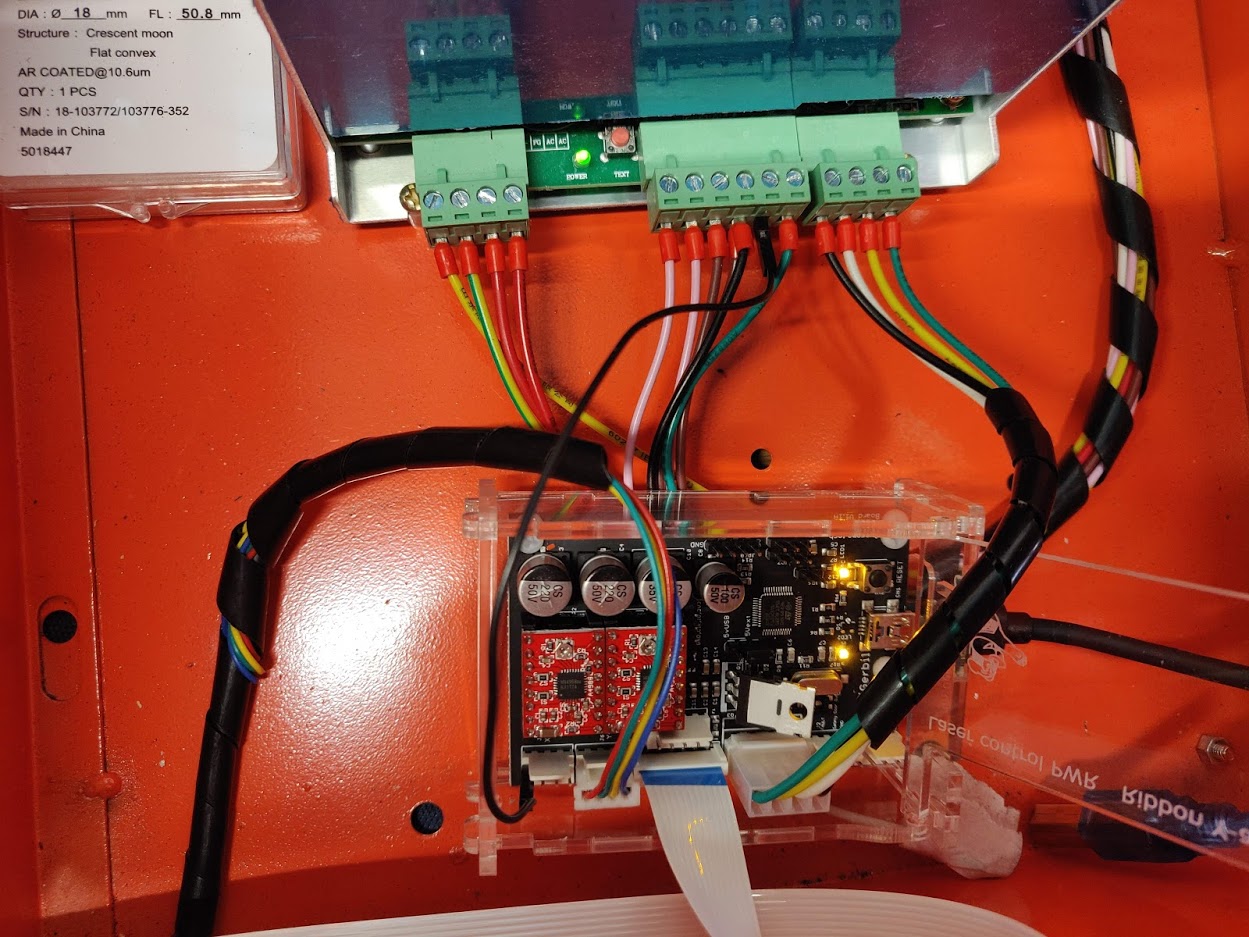
Quote from Paul on June 25, 2019, 2:56 pmHi, from the photo I can see you have connected the PWM wire to a motor axis output (1 pin of the left). It should go to the first pin on the right of the board (viewing the board from the connector side, like the photo depicts).
If LightBurn can't find your laser then manually add the device driver from lightburn's devices list (STM_Gerbil). If that still does not connect then check the USB cable. Some are just charger cables. The board should should a flashing led as heart beat indicator. Once connected, the heart beat is replaced by a blink when a line of G-code is processed. If no data is streamed then the led has a very slow blink rate (once every 10 seconds).
If connection is problematic then you can set the jumper selection JP1 from 5vExt to 5vUSB. The board is then powered via the usb port from the computer instead of the laser power supply. If that solves it then investigate the ground between the mini Gerbil and laser.
Hope this helps.
Hi, from the photo I can see you have connected the PWM wire to a motor axis output (1 pin of the left). It should go to the first pin on the right of the board (viewing the board from the connector side, like the photo depicts).
If LightBurn can't find your laser then manually add the device driver from lightburn's devices list (STM_Gerbil). If that still does not connect then check the USB cable. Some are just charger cables. The board should should a flashing led as heart beat indicator. Once connected, the heart beat is replaced by a blink when a line of G-code is processed. If no data is streamed then the led has a very slow blink rate (once every 10 seconds).
If connection is problematic then you can set the jumper selection JP1 from 5vExt to 5vUSB. The board is then powered via the usb port from the computer instead of the laser power supply. If that solves it then investigate the ground between the mini Gerbil and laser.
Hope this helps.
Quote from Shanx on June 27, 2019, 3:02 amHi Paul thanks for replying 😀
I have swapped the PWM wire over but the problem still persists.
I have linked a video to my setup... is there something obvious that I am missing or is something broken on my machine?https://youtu.be/hefzvD2Uy0Y
Hi Paul thanks for replying 😀
I have swapped the PWM wire over but the problem still persists.
I have linked a video to my setup... is there something obvious that I am missing or is something broken on my machine?
Quote from Paul on June 28, 2019, 7:34 amHi Shanx,
It' hard to tell but from the Alarm 8 error, I guess you have to increase the pull off distance of the limit switches via $27=4 to clear the engage/disengage hysteresis band of the switch.
Let's know if that helped
Cheers, Paul
Hi Shanx,
It' hard to tell but from the Alarm 8 error, I guess you have to increase the pull off distance of the limit switches via $27=4 to clear the engage/disengage hysteresis band of the switch.
Let's know if that helped
Cheers, Paul
Quote from Deleted user on June 30, 2019, 8:17 pmi had the same type of thing happen to me i need to invert limit switches you need to set $5 to $5=0
i had the same type of thing happen to me i need to invert limit switches you need to set $5 to $5=0
Quote from Shanx on July 1, 2019, 1:16 amHi guys, thanks, I've done both those codes and now when I press 'home' it just goes to the left and doesn't stop until I get error code 2 alarm code 9.
Is my stop sensor thing broken? Why doesn't it also travel back now?
Hi guys, thanks, I've done both those codes and now when I press 'home' it just goes to the left and doesn't stop until I get error code 2 alarm code 9.
Is my stop sensor thing broken? Why doesn't it also travel back now?
Quote from Paul on July 2, 2019, 8:19 amOkay so something is not correct with the limit switches. Check them with the Gantry in it's home position and outside the home position and see whether you get a limit status.
To interrogate the board, issue a "?" status command (without the quotes...) via a g-code sender or in Lightburn's console.
When engaged you should see Pn:XY... not engaged and that status disappears.
Okay so something is not correct with the limit switches. Check them with the Gantry in it's home position and outside the home position and see whether you get a limit status.
To interrogate the board, issue a "?" status command (without the quotes...) via a g-code sender or in Lightburn's console.
When engaged you should see Pn:XY... not engaged and that status disappears.
Quote from Shanx on August 11, 2019, 8:09 pmHiya, okay so I've managed to sort out the homing problem!
It turns out that my optical limit switches or endstops were faulty.
I re-wired mechanical ones in and they seem to be working okay.
I fitted the old nano board back in to test it all and everything was coolio.Then I tried to install the gerbil again and when I try to test a file in lightburn the laser turns on and doesn't turn off and just runs without stopping. Is there a setting I need to change?
Thanks in advance!
Hiya, okay so I've managed to sort out the homing problem!
It turns out that my optical limit switches or endstops were faulty.
I re-wired mechanical ones in and they seem to be working okay.
I fitted the old nano board back in to test it all and everything was coolio.
Then I tried to install the gerbil again and when I try to test a file in lightburn the laser turns on and doesn't turn off and just runs without stopping. Is there a setting I need to change?
Thanks in advance!
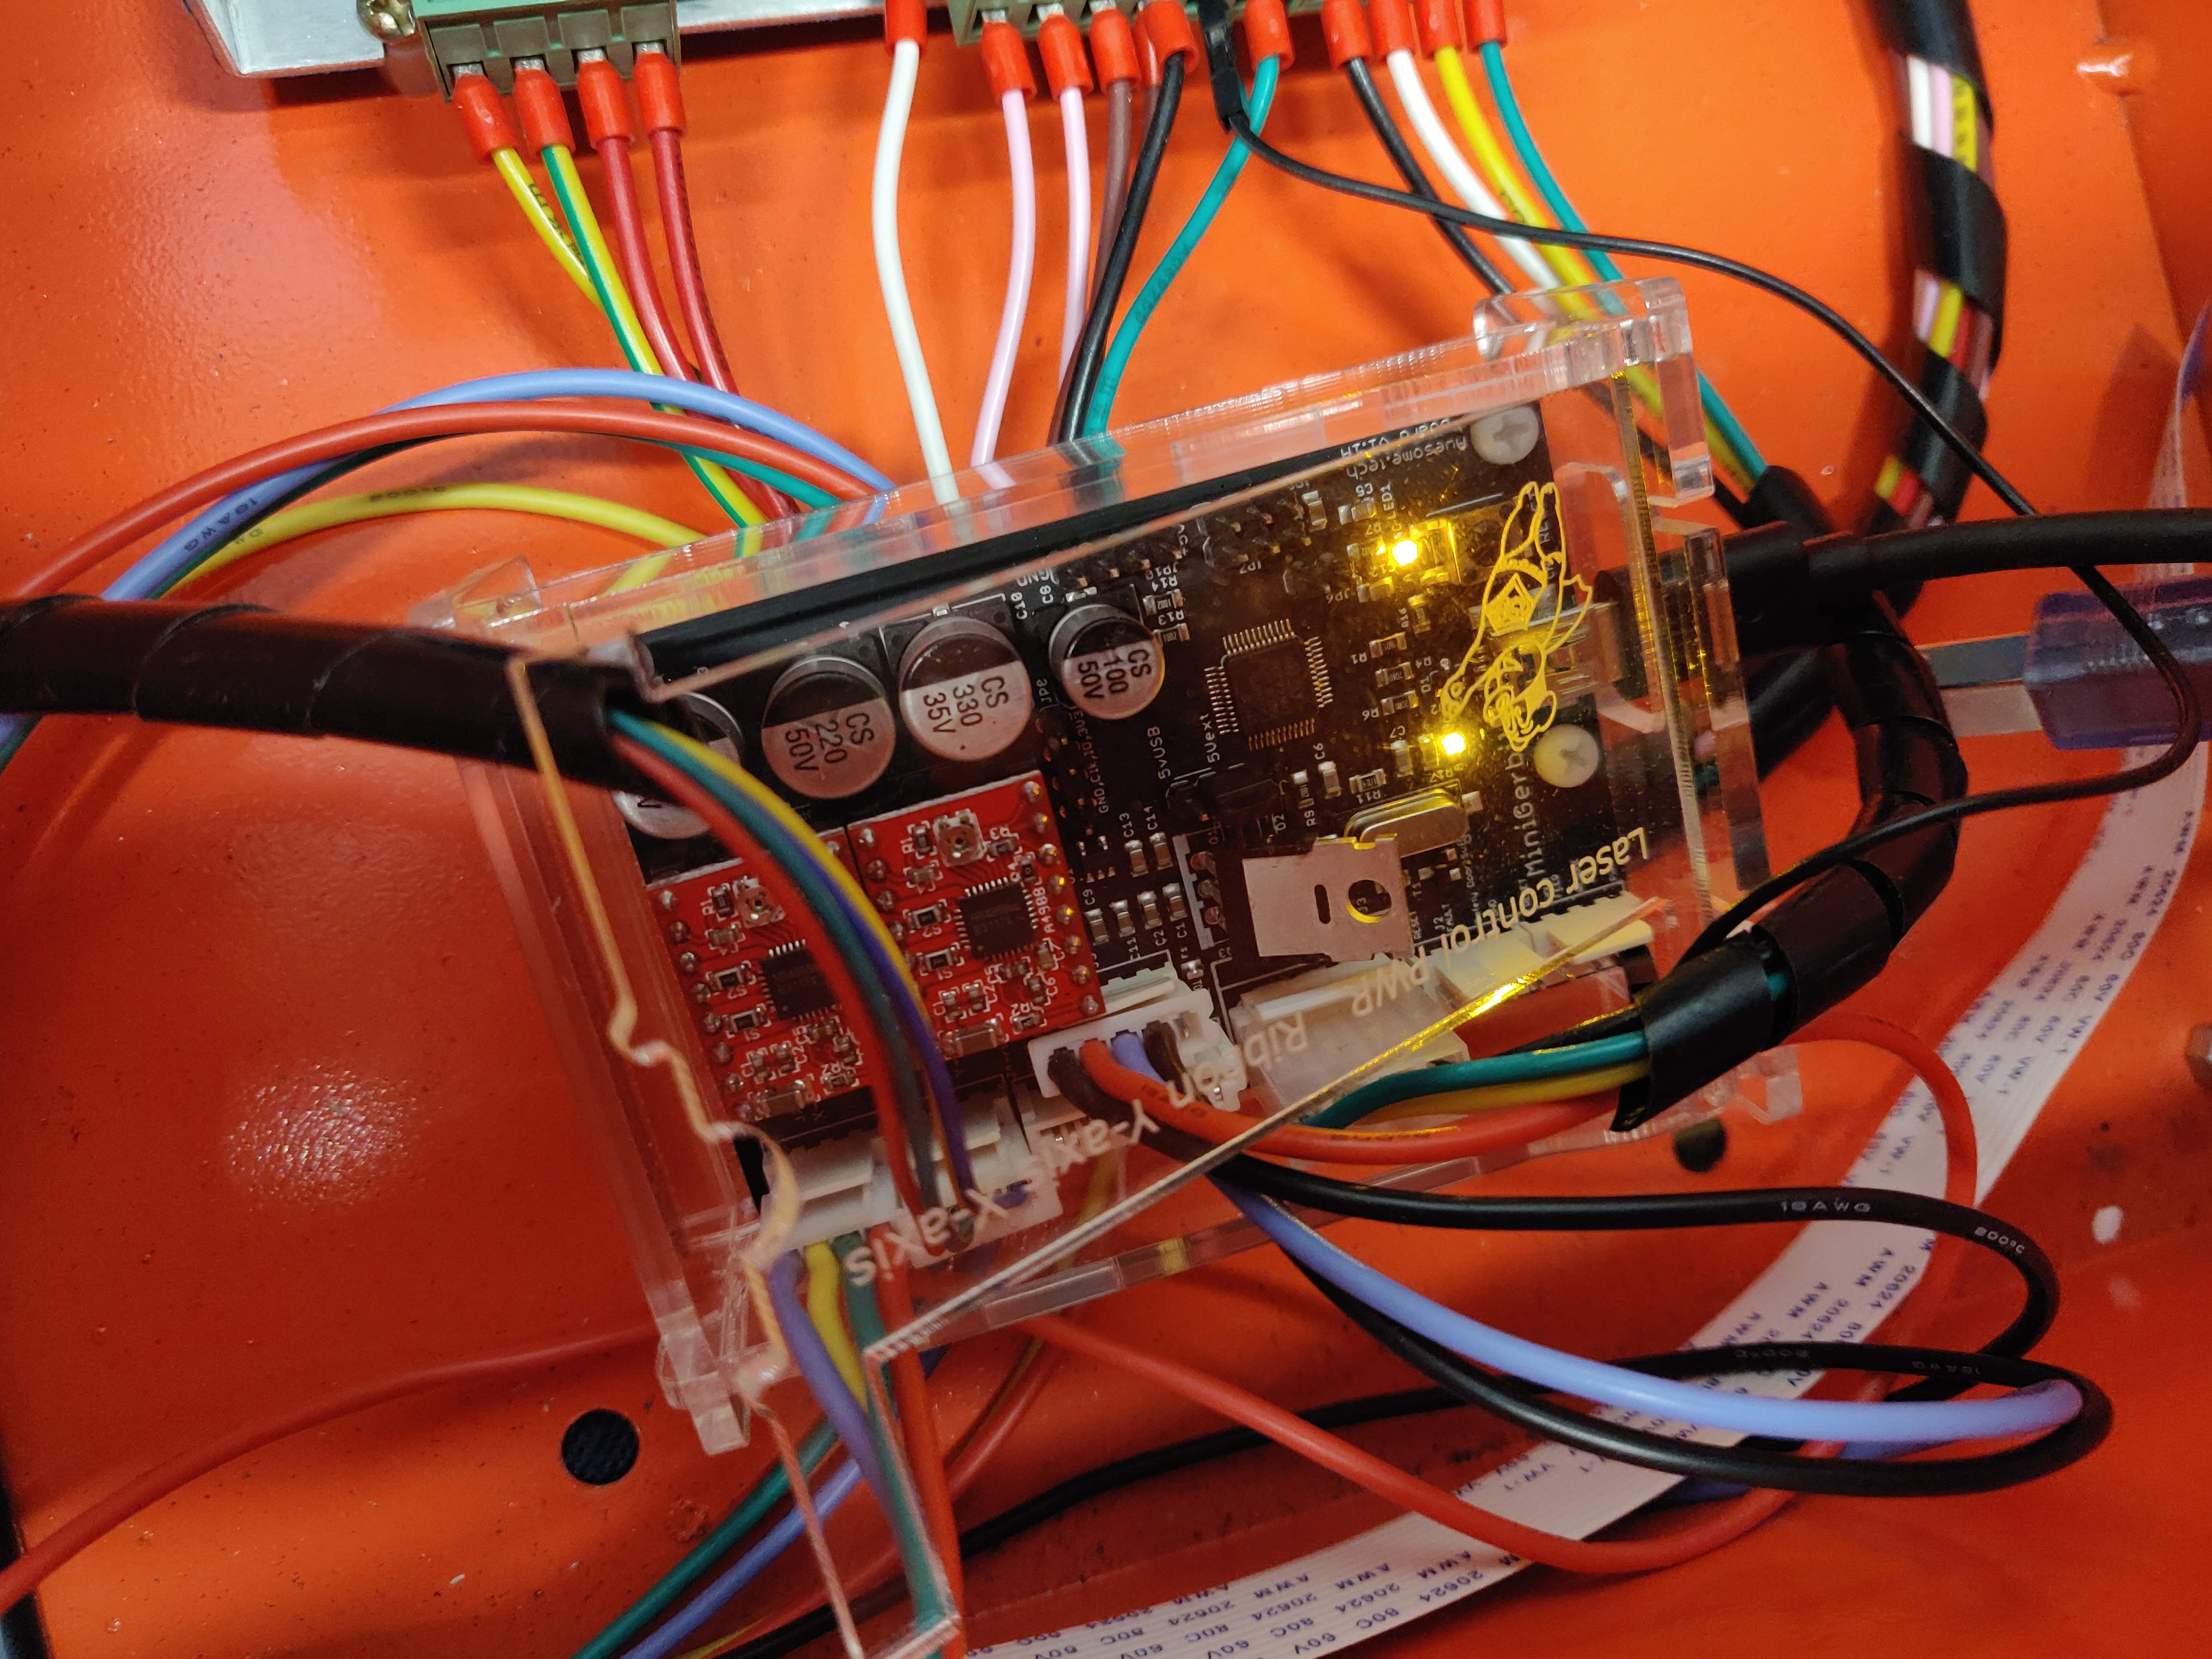
Uploaded files:
Quote from Paul on August 11, 2019, 9:50 pmHi, if the laser stays on means your LO connection is loose (0 volt). (LO means laser on and it uses 0 volt to turn on and 5V to turn off.).
Re-seat the power connector on the mini Gerbil and it probably sorts it self out.
Cheers
Hi, if the laser stays on means your LO connection is loose (0 volt). (LO means laser on and it uses 0 volt to turn on and 5V to turn off.).
Re-seat the power connector on the mini Gerbil and it probably sorts it self out.
Cheers
Quote from Shanx on August 16, 2019, 2:03 amHiya,
Right I tried the wire and eliminated it as an issue. The problems still there when I swap the wire over to one that definitely works (and it's definitely attached).
Could there be something else?
I feel like I'm on the last few steps in order to get this thing to work...
But it's frustrating as hell.
Hiya,
Right I tried the wire and eliminated it as an issue. The problems still there when I swap the wire over to one that definitely works (and it's definitely attached).
Could there be something else?
I feel like I'm on the last few steps in order to get this thing to work...
But it's frustrating as hell.
Quote from Paul on August 16, 2019, 9:07 amHi, sorry that you're encountering such a frustrating issue.
Pls can you tell me what the remaining issue is. Is it the laser not turning off?
Some information that might help to debug the issue:
LO - Laser on connection that needs to pulled down to zero volt to enable the power supply
IN - PWM input of the laser supply that need a PWM signal. When not connected (open connection) the laser fires 10mA.
Cheers, Paul
Hi, sorry that you're encountering such a frustrating issue.
Pls can you tell me what the remaining issue is. Is it the laser not turning off?
Some information that might help to debug the issue:
LO - Laser on connection that needs to pulled down to zero volt to enable the power supply
IN - PWM input of the laser supply that need a PWM signal. When not connected (open connection) the laser fires 10mA.
Cheers, Paul